Table of Contents
Introduction
Have you been told to start scuba diving with a weight equal to 10% of your body weight and to trust that number?
Many beginner divers use the scuba weight calculator thumb rule because it feels simple and removes the guesswork from getting started. Dive shops, instructors, and rental setups often present the 10% method as a quick estimate. But what works for one diver may feel completely wrong for another. Factors like wetsuit thickness, body composition, tank type, and water conditions can change your ideal setup more than most beginners expect.
So, is the popular 10% scuba weight rule actually reliable, or is it just a rough starting point?
In this guide, you’ll learn what the scuba weight thumb rule really means, when it works, and where it breaks down. You’ll also discover a smarter approach using buoyancy principles and beginner-friendly scuba weighting methods to help you dive more comfortably and safely.
Estimate your starting scuba weight in seconds and fine-tune it with a buoyancy check.
What Is the Scuba Weight Thumb Rule (10% Rule)?
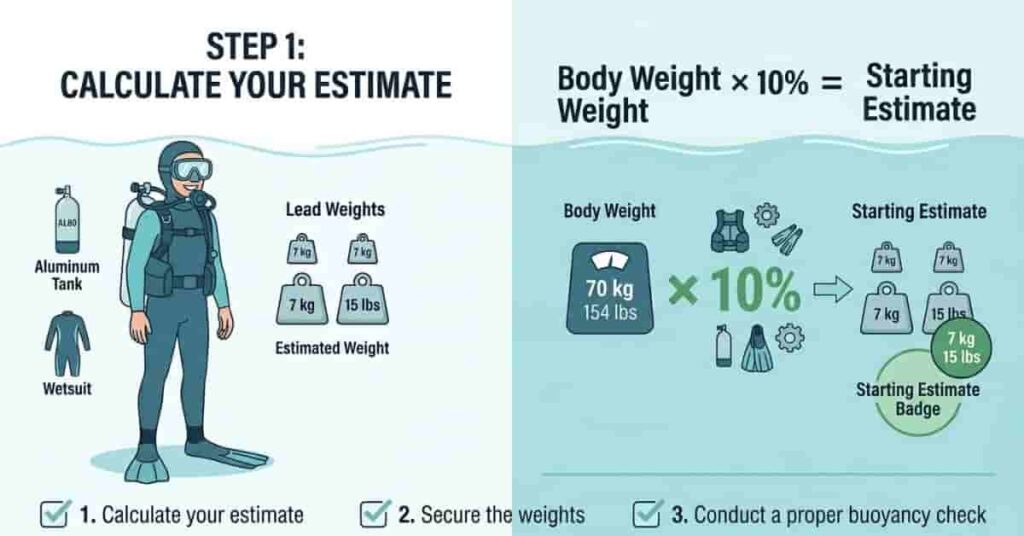
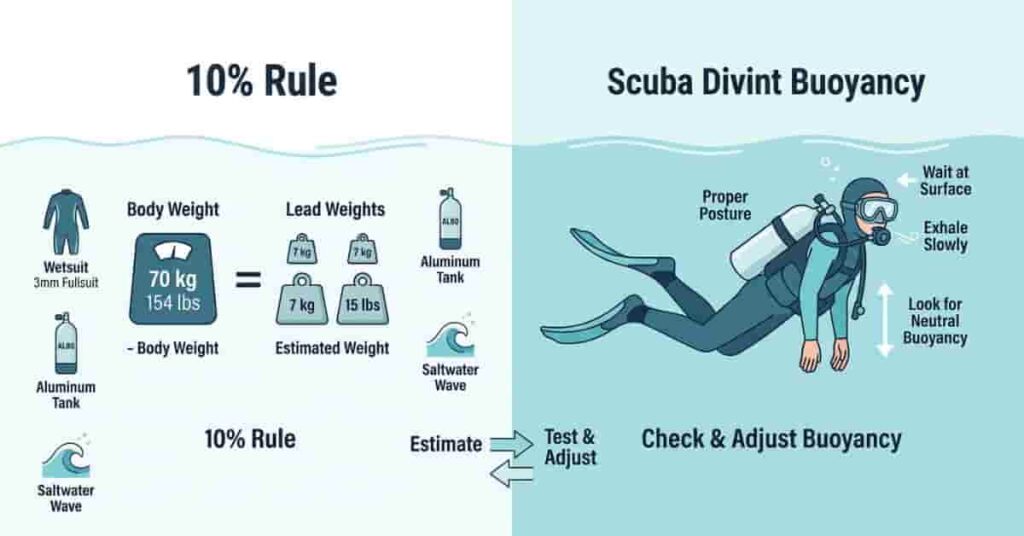
The scuba weight calculator’s thumb rule is a simple starting method for estimating how much lead weight a diver may need. The most common version suggests beginning with weight equal to about 10% of total body weight. Many beginners hear this during entry-level training because it gives a quick estimate before entering the water.
The basic idea is simple:
Body weight × 10% = Starting scuba weight estimate
For example, if a diver weighs 180 lb, the 10% scuba weight rule would suggest starting with 18 lb of weight.
This approach became popular because it made instruction for beginners easier. Early scuba training often used similar rental gear, standard aluminium tanks, and warm-water conditions. In those situations, instructors needed a fast method that worked reasonably well for most students without long calculations.
Training environments also played a role. Dive schools and rental centres often operated with predictable equipment setups. Because of that consistency, a simple scuba diving weight rule of thumb saved time and helped new divers enter the water faster.
However, the rule was never designed to deliver perfect buoyancy. It does not account for wetsuit thickness, body composition, water type, tank buoyancy, or individual breathing habits. Two divers with the same body weight may need very different amounts of lead.
That’s why experienced divers treat the scuba weighting formula as a starting estimate, not a final answer.
Not sure how much lead you need? Try the scuba weight calculator and start with confidence.
Takeaway
The 10% rule is useful for estimating a beginner’s scuba weight, but proper weighting always requires real buoyancy checks and in-water adjustments.
When the 10% Rule Actually Works
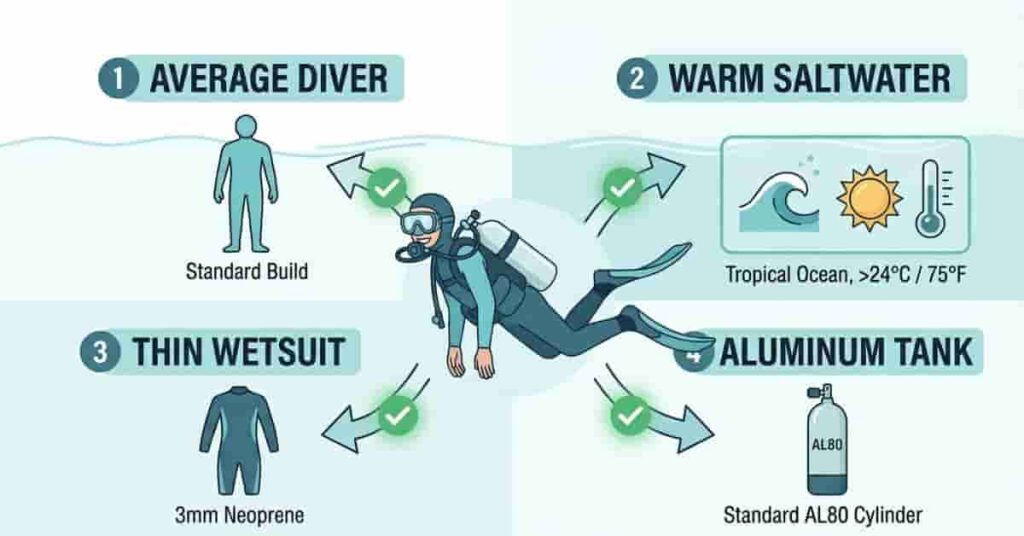
The 10% scuba weight rule is not completely wrong. It can work surprisingly well in certain conditions. That is why many beginner divers still hear it during training. The key is to understand that the rule performs best when the dive setup matches its assumptions.
Most thumb rules come from environments with predictable gear, average conditions, and recreational dive profiles. Once those variables change, the estimate often becomes less reliable.
Average Body Composition
The scuba weight calculator thumb rule tends to work better for divers with average recreational body composition. It assumes a typical balance of body fat, muscle mass, and natural buoyancy.
For example, two divers may weigh the same but float differently in water. A lean diver with more muscle may need less weight than expected. Another diver may need more adjustment depending on natural buoyancy.
Because of this, the 10% estimate works best as a starting point for average recreational divers rather than a universal formula.
Warm Saltwater Conditions
Warm ocean destinations are one of the most common places where the rule performs reasonably well.
Many beginner certification dives happen in tropical locations with stable conditions and minimal exposure protection. Saltwater increases buoyancy, so divers usually carry more weight than they would in freshwater.
Since training programs often account for these conditions, the estimate may land closer to the final result.
Thin Wetsuits (3mm or Less)
Thin wetsuits add less buoyancy to the diver. That makes weight prediction easier.
A 3mm wetsuit or a light-exposure setup creates fewer variables than a thicker cold-water suit. Because there is less trapped air and less flotation, the starting estimate may stay reasonably accurate.
This is one reason warm-water vacation divers often find the rule “close enough” for an initial setup.
Standard Aluminium Tank Setups
The rule also performs better with standard rental equipment.
Many recreational dive centres use similar aluminium tank configurations. Since training assumptions were built around common rental setups, beginner estimates become more predictable.
Changing to steel tanks or specialised gear can shift buoyancy and reduce accuracy.
Controlled Recreational Diving
The rule works best during simple recreational dives with moderate depth and straightforward conditions.
Examples include:
- Entry-level certification dives
- Vacation reef diving
- Moderate depth profiles
- Calm water conditions
These dives usually involve fewer equipment changes and easier buoyancy control.
Why the 10% Rule Often Fails
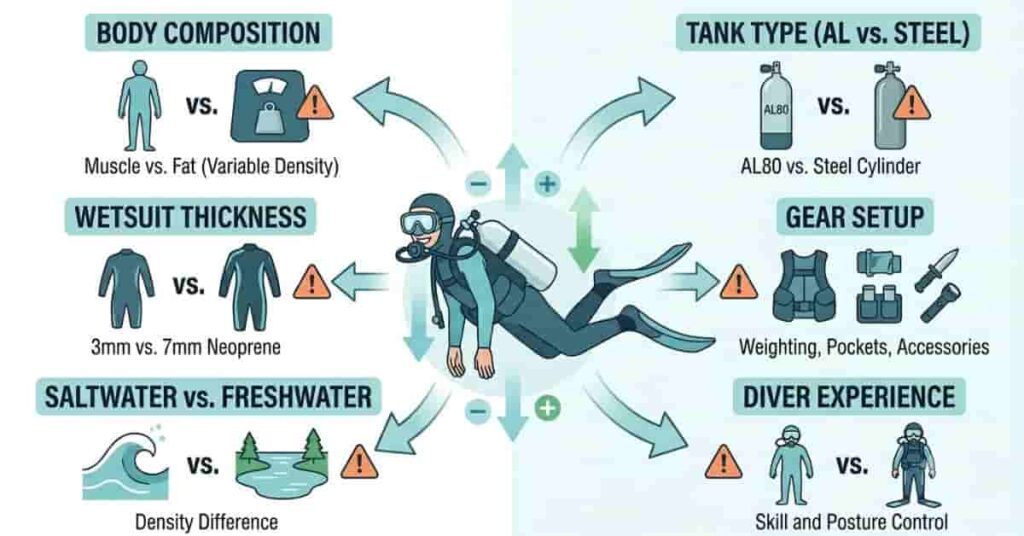
The biggest problem with the 10% scuba weight rule is simple: weight needs change because buoyancy changes.
The rule assumes divers have similar bodies, gear, and diving conditions. Real diving rarely works that way. Small differences in equipment or environment can create noticeable changes underwater. That is why two divers with the same body weight may need completely different amounts of lead.
Understanding these variables helps beginners move beyond estimates and toward proper scuba weighting.
Body Fat vs Muscle Composition
Body composition affects natural buoyancy more than many beginners expect.
Body fat is generally more buoyant than muscle. Because of this, two divers who weigh exactly the same may float very differently. One diver may require additional weight, while another may need less.
This is one reason a fixed scuba weighting formula cannot accurately predict every diver.
Wetsuit Thickness Changes Everything
Wetsuits create buoyancy because neoprene traps gas.
A thin 3mm wetsuit usually adds less buoyancy than thicker exposure protection. Moving to a 5mm or 7mm suit often changes the weighting enough to make a simple percentage unreliable.
Cold-water divers especially notice this difference. More insulation usually means more flotation.
This is why beginner scuba weight estimation should always include exposure protection, not body weight alone.
Saltwater vs Freshwater Differences
Water type changes how much your body and equipment float.
Saltwater is denser than freshwater. That added density increases buoyancy and often requires more lead than in freshwater diving.
A diver who feels perfectly weighted in a lake may suddenly feel too light in the ocean.
Many travel divers discover this after using the same setup in different locations.
Tank Buoyancy Differences
Not all scuba tanks behave the same underwater.
Standard aluminium tanks and steel tanks can create different buoyancy characteristics throughout a dive. Tank behaviour may also change as breathing gas is used.
Because of that, switching tanks can affect trim and neutral buoyancy even if body weight stays unchanged.
This is one reason experienced divers log equipment details after each dive.
Gear Configuration Variations
Small equipment changes can affect weighting more than beginners expect.
Examples include:
- Different BCD styles
- Extra accessories
- Camera equipment
- Integrated weight systems
- Exposure layers
Even changing rental gear between trips can create noticeable differences.
A weight estimate is only useful when equipment remains consistent.
Diver Skill and Experience
Experience changes weighting needs over time.
New divers often breathe more deeply and move more underwater. That can create larger buoyancy swings. As skills improve, breathing becomes calmer, and trim becomes more controlled.
Many divers eventually reduce lead after gaining experience and improving buoyancy control.
This is why the answer to how much weight to use for scuba diving changes over time.
Takeaway
The 10% rule fails because buoyancy is personal. Body composition, wetsuits, water type, tanks, gear, and experience all influence the final result. Use the estimate as a starting point, then confirm your setup through real buoyancy testing.
The Biggest Factors That Affect Scuba Weighting
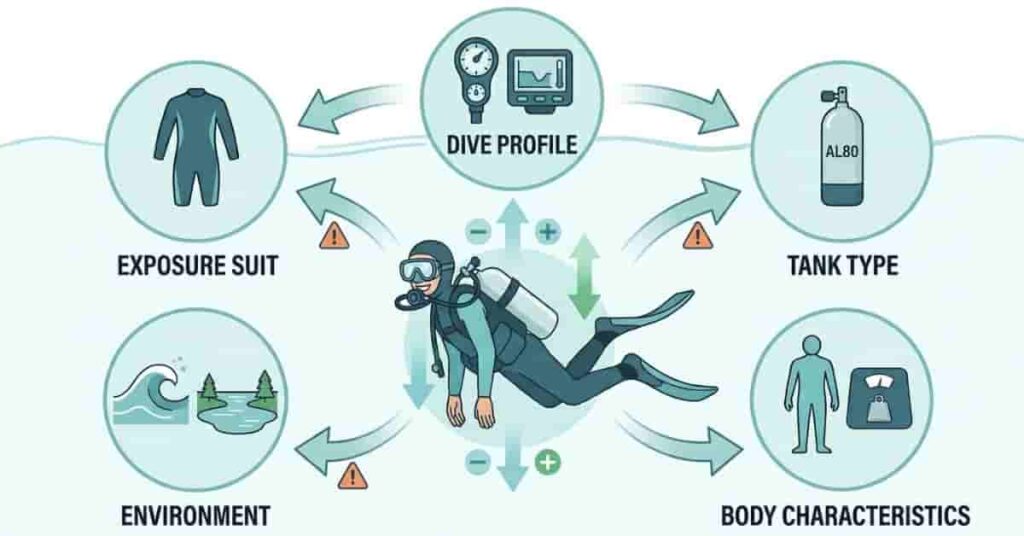
Many new divers expect one number to work everywhere. In reality, proper scuba weighting changes from dive to dive. Your equipment, environment, and even how you dive can affect neutral buoyancy.
That is why experienced divers do not rely only on the scuba weight calculator thumb rule. They look at the variables first and then adjust them in the water.
Understanding these factors makes estimating a beginner’s scuba weight safer and more accurate.
Exposure Protection
Your exposure suit is one of the biggest factors in your weight because different materials create varying levels of buoyancy.
A rash guard usually adds very little buoyancy, so divers often need minimal adjustment.
A shorty wetsuit adds a small amount of flotation and may require a modest increase.
A full wetsuit creates more buoyancy as thickness increases. Moving from thin warm-water protection to thicker suits can noticeably change weight needs.
A drysuit works differently because air inside the suit affects buoyancy throughout the dive. Drysuit setups usually require their own weighting process.
As a general rule, more exposure protection often means more buoyancy adjustment.
Tank Type
Tank choice affects more than gas capacity.
Steel tanks often exhibit different buoyancy characteristics and may reduce the amount of lead some divers carry.
Aluminium tanks are common in rental environments and can behave differently as gas is used during the dive.
A diver who changes from aluminium to steel may need to adjust weight even if everything else stays the same.
Always treat a tank change as a reason to recheck buoyancy.
Environment
Water conditions can change quickly.
The ocean generally creates more buoyancy because saltwater is denser.
A quarry may behave differently depending on water conditions and equipment used.
A lake often requires less weight compared with typical saltwater diving.
Travel divers often notice this first. The same setup that feels perfect at home may feel completely different at a new destination.
Mini case:
A diver comfortable in freshwater training may arrive at a tropical resort and suddenly struggle to descend without adjusting weight.
Body Characteristics
Body size alone does not determine proper weighting.
Height changes body volume. Total weight influences starting estimates. Body composition changes natural buoyancy.
Two divers with identical body weight can still require different setups underwater.
This explains why a fixed scuba diving weight rule of thumb cannot replace real testing.
Track patterns instead of chasing one universal number.
Dive Profile
How you plan to dive also matters.
Deeper dives can change suit compression and buoyancy behaviour. Longer dives reduce tank gas over time, which may affect balance near the end of the dive.
Gas consumption also changes the overall system during the dive.
For that reason, divers should confirm they can maintain neutral buoyancy not only at the beginning but also near the end of the dive.
Better Than the Thumb Rule: Modern Scuba Weight Calculation
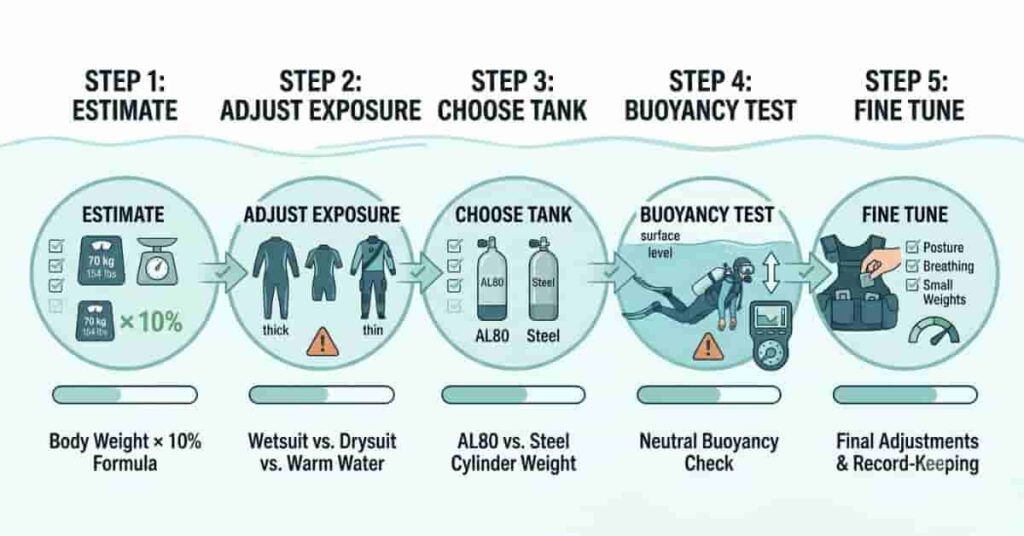
The scuba weight calculator thumb rule gives a quick estimate, but modern weighting methods focus on something more reliable: buoyancy.
Percentages assume all divers behave the same underwater. They do not account for exposure gear, tank differences, body characteristics, or changing conditions. Buoyancy-based weighting works differently. It starts with an estimate and then confirms the result through testing.
That is why experienced divers rarely stop at a percentage.
Instead of asking, “How much should someone my weight carry?” the better question is, “Can I maintain neutral buoyancy comfortably and consistently?”
A modern scuba weighting formula follows a simple process.
1. Start Conservative
Begin with a reasonable estimate rather than adding extra weight immediately.
You can use the 10% scuba weight rule as a rough starting point if conditions are familiar. Starting slightly conservatively makes adjustments easier and helps avoid unnecessary overweighting.
More weight is not always better.
2. Add Exposure Adjustment
Next, consider what you are wearing.
A rash guard, shorty, full wetsuit, or drysuit changes buoyancy differently. Thicker exposure protection generally increases flotation and may require additional adjustment.
Treat every change in exposure as a new weighting setup.
3. Consider Tank Type
Before entering the water, account for the tank you plan to use.
Standard aluminium and steel tanks can affect buoyancy differently during the dive. If your equipment differs from that used in previous dives, your weighting should be reviewed as well.
Do not assume old numbers automatically transfer.
4. Enter Water and Test
Now verify the estimate.
Perform a controlled buoyancy check in calm conditions. Check whether you can float comfortably at the surface and descend without excessive effort.
If the setup feels difficult, make small changes instead of large corrections.
5. Fine-Tune and Record
After the dive, adjust gradually and keep notes.
Record:
- Total weight
- Exposure protection
- Tank type
- Water type
- Comfort notes
Over time, your personal log becomes more accurate than any general information about how much weight to use for scuba diving.
Expert Tip:
Change only one variable at a time. If you change your suit, tank, and weight together, it becomes harder to know what affected buoyancy.
How to Perform a Proper Scuba Buoyancy Check
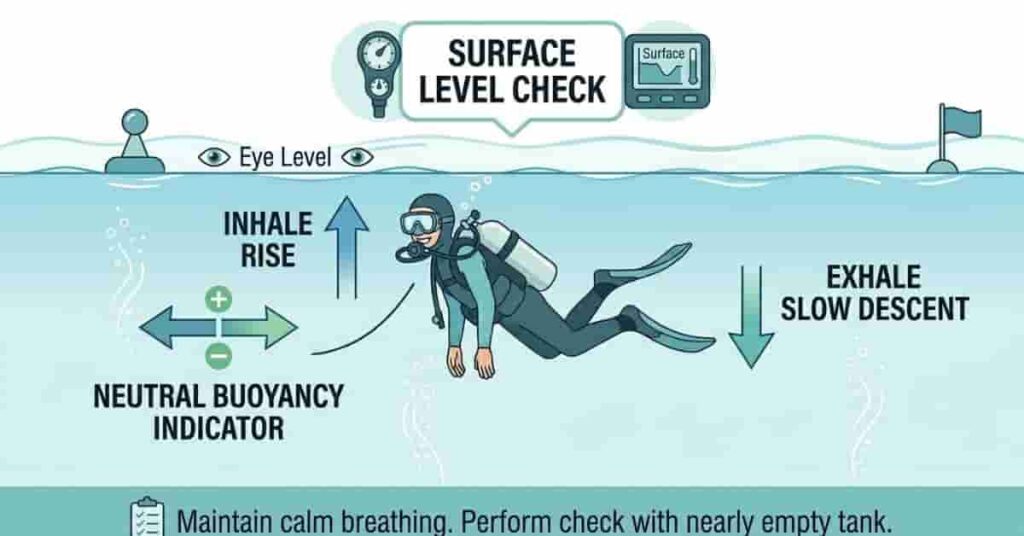
A buoyancy check is the most reliable way to determine proper scuba weighting. While the scuba weight calculator thumb rule can provide a starting estimate, a buoyancy check confirms whether that estimate actually works in the water.
Professional divers trust buoyancy checks because they measure real-world conditions instead of relying on assumptions. Your body, equipment, and environment all affect buoyancy. A quick in-water test accounts for those variables and helps prevent both overweighting and underweighting.
For the most accurate results, divers should evaluate buoyancy with near-empty tank conditions in mind. A full tank contains more gas and may behave differently than it will near the end of the dive. Proper weighting should allow comfortable buoyancy control throughout the entire dive, including the safety stop.
Step 1: Position Yourself at the Surface
Enter calm water and fully inflate your BCD. Relax your body and maintain a vertical position.
Once settled, release air from your BCD while breathing normally. Avoid kicking or sculling with your hands. Let the water support you naturally.
Step 2: Use Normal Breathing
Breathing plays a major role in buoyancy.
Take a normal breath and observe your position. Then exhale slowly and naturally. Do not force air out or hold your breath.
A properly weighted diver should descend gradually when exhaling and rise slightly when inhaling.
This simple test shows whether your beginner scuba weight estimate is within the correct range.
Step 3: Validate With a Controlled Descent
After the surface check, perform a slow descent.
If you sink rapidly without effort, you may be carrying too much weight. If descending requires excessive kicking, you may need a small adjustment.
The goal is a smooth, controlled descent rather than a fast drop or a constant struggle to reach the water.
Step 4: Make Small Adjustments
Avoid large changes.
Adding or removing a small amount of weight at a time makes it easier to identify the correct setup. Large adjustments often create new buoyancy problems.
Many divers improve their weighting by making gradual refinements over several dives instead of chasing a perfect number immediately.
Buoyancy Check Checklist
✓ Float at eye level while breathing normally
✓ Exhale → descend slowly and smoothly
✓ Inhale → rise slightly and under control
✓ Descend without excessive kicking
✓ Stay neutral during a safety stop
✓ Make only small weight adjustments when needed
Quick Reference: Scuba Weight Thumb Rule Adjustment Guide
Use this guide only as a rough framework for adjustments, not a final weighting system.
The scuba weight calculator’s thumb rule can help provide a starting estimate, but actual buoyancy depends on more than body weight. Changes in water type, exposure protection, equipment, and diving skill often affect how much weight feels correct underwater.
Think of this chart as a quick reminder of which direction weighting commonly moves. It does not replace a buoyancy check.
| Variable | Typical Direction |
| Saltwater | Usually more weight |
| Freshwater | Usually less weight |
| Thin exposure | Less weight |
| Thick exposure | More weight |
| Steel tank | Often less lead |
| Aluminum tank | Often more lead |
| Improved technique | Sometimes less weight |
A few patterns appear consistently.
Saltwater usually increases buoyancy compared with freshwater. Thicker exposure protection generally creates more flotation than lighter exposure systems. Tank configuration can also shift the balance underwater.
Experience matters too. Many divers discover they need less lead over time as breathing control and trim improve. Better buoyancy skills often reduce unnecessary weighting.
One common mistake is adjusting multiple variables at once. If you change your suit, tank, and weight all at once, it becomes difficult to identify what actually improved or worsened your buoyancy.
Comparison: Thumb Rule vs Real Scuba Weight Calculation
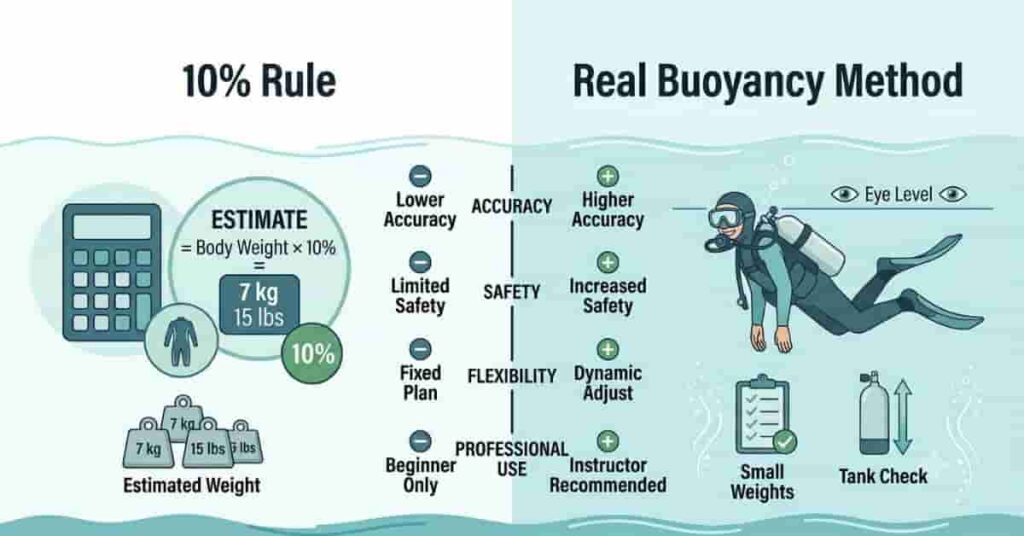
The scuba weight calculator thumb rule remains popular because it is fast and easy to understand. For many beginners, starting with a simple estimate feels less intimidating than learning the principles of buoyancy immediately.
But convenience and accuracy are not the same thing.
The 10% approach works as a rough starting point under predictable conditions. Modern scuba weighting methods focus on real-world testing instead. They measure how your body, equipment, and environment behave underwater.
This comparison shows where each method performs best.
| Factor | 10% Rule | Real Buoyancy Method |
| Accuracy | Moderate | High |
| Beginner Friendly | Excellent | Good |
| Safety | Moderate | Higher |
| Equipment Flexibility | Low | High |
| Professional Use | Rare | Standard |
The biggest advantage of the 10% scuba weight rule is simplicity. A beginner can create an estimate within seconds and start building confidence.
The downside is that percentages cannot adapt automatically. They do not respond to changing suits, tanks, environments, or individual buoyancy differences.
The real buoyancy method takes more effort at first, but it produces more reliable results. Instead of assuming a number should work, divers enter the water, test conditions, and adjust gradually.
This method also scales better over time. As divers gain experience, their weighting becomes more consistent and repeatable.
Mini Case
Two divers each weigh 180 lb and start with the same estimate. One uses a thin warm-water setup and feels balanced. The other switches to thicker exposure gear and struggles with buoyancy. The body weight stayed the same, but the underwater conditions changed.
That is where real testing becomes more valuable than fixed formulas.
Example Scenarios Where the 10% Rule Fails
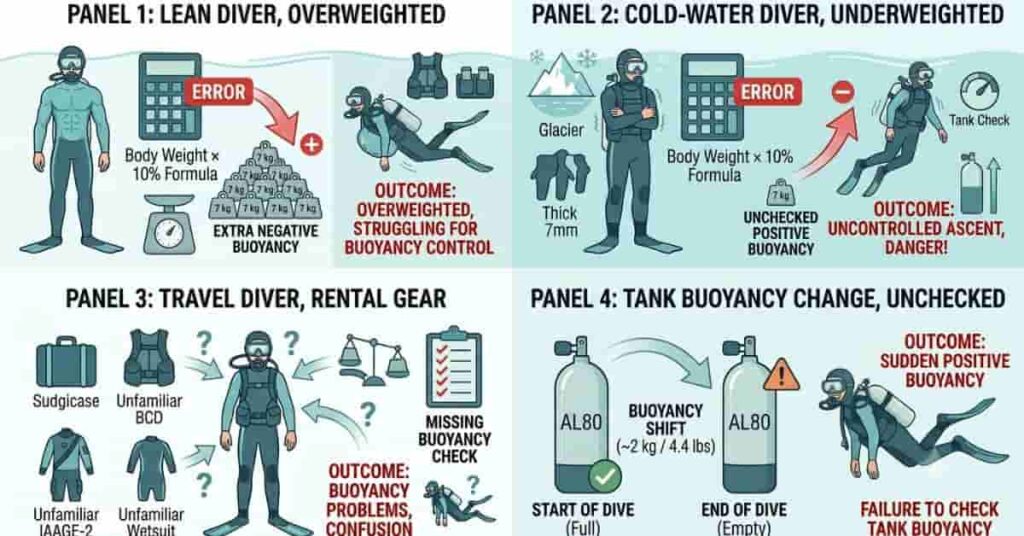
The 10% scuba weight rule sounds simple because it reduces the weighting to a single number. The problem is that real dives do not happen under identical conditions.
Small changes in equipment, exposure protection, and environment can create completely different buoyancy results. These examples show why the scuba weight calculator thumb rule should remain a starting estimate rather than a final answer.
Scenario 1: Lean Diver Gets Overweighted
A diver follows the 10% estimate exactly and enters the water carrying more lead than needed.
Because the diver has lower natural buoyancy, the extra weight creates problems almost immediately. Descents become faster, maintaining trim becomes harder, and buoyancy control feels less stable.
Overweighting can also increase effort underwater. That may lead to less efficient movement and potentially higher air use during the dive.
The number looked correct on paper, but it did not match the diver.
Scenario 2: Cold-Water Diver Is Underweighted
Another diver uses the same body-weight estimate but changes to cold-water equipment.
This time, the diver wears thicker exposure protection. The added buoyancy from the suit changes the entire setup.
At the surface, descending becomes difficult. Extra effort is needed just to begin the dive.
This is one reason beginner scuba weight estimation becomes less reliable as exposure protection increases.
Scenario 3: Travel Diver Changes Equipment
A diver travels, assuming their usual setup will still work.
Body weight stays the same, but the rental equipment changes. Different BCD designs, exposure gear, and tank configurations create different buoyancy profiles.
The result may feel confusing because the old number suddenly no longer works.
Many divers first realise the limits of the scuba diving weight rule of thumb while travelling.
Scenario 4: Tank Change Alters Neutral Buoyancy
A diver switches tank types and expects no difference.
The dive begins normally, but buoyancy feels different later on. As breathing gas changes during the dive, maintaining a neutral position becomes less predictable than expected.
The diver notices that holding a comfortable safety stop becomes more difficult.
Nothing changed except the tank setup.
This example shows why weighting should support the entire dive, not only the first few minutes.
Should Beginners Still Use the 10% Rule?
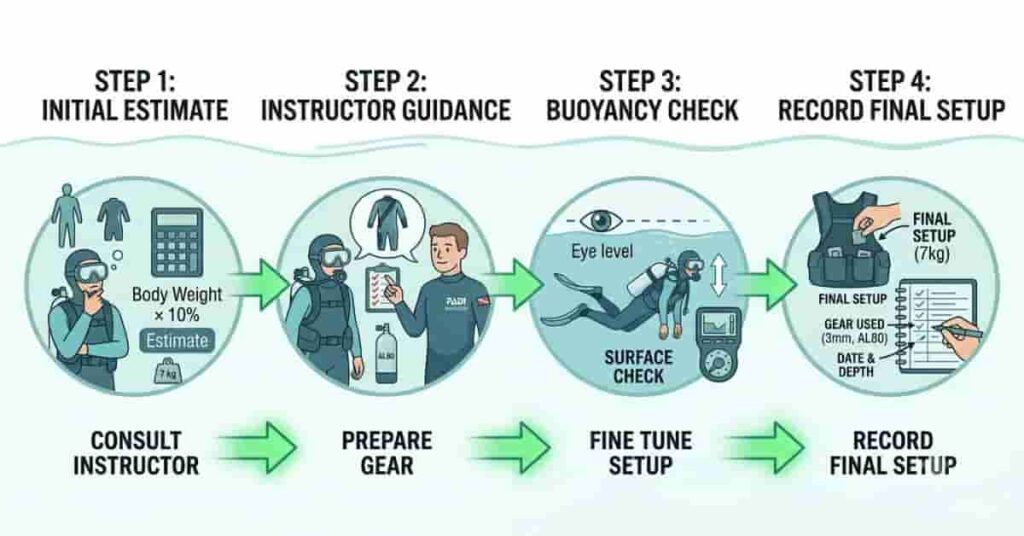
The short answer is yes—but with limits.
The scuba weight calculator thumb rule can help beginners create a starting point when they have little experience with buoyancy. A simple estimate reduces guesswork and gives new divers more confidence before entering the water.
That said, the estimate should never become the final decision.
The 10% approach works best in predictable situations, such as recreational dives with familiar equipment, light exposure protection, and standard training conditions. In those cases, it may place beginners close enough to begin testing safely.
This is also why instructors sometimes introduce thumb rules during early training. A quick estimate helps students focus on learning skills instead of getting overwhelmed by calculations.
However, good instruction does not stop at percentages.
Most divers quickly discover that body weight alone cannot account for changes in suits, tanks, water conditions, or personal buoyancy. As experience grows, divers move away from fixed formulas and begin relying more on buoyancy checks and repeatable adjustments.
A useful habit is recording successful setups after every dive.
Keep notes on:
- Total weight used
- Exposure protection
- Tank type
- Water environment
- Comfort and buoyancy observations
Over time, this creates a personal reference system that becomes more reliable than any general rule for scuba diving.
Mini Case
A beginner starts with a 10% estimate during training and feels comfortable after removing a small amount of weight during the buoyancy check. On later dives, that recorded setup becomes a more useful reference than repeating the original formula.
How Experienced Divers Calculate Weight More Reliably
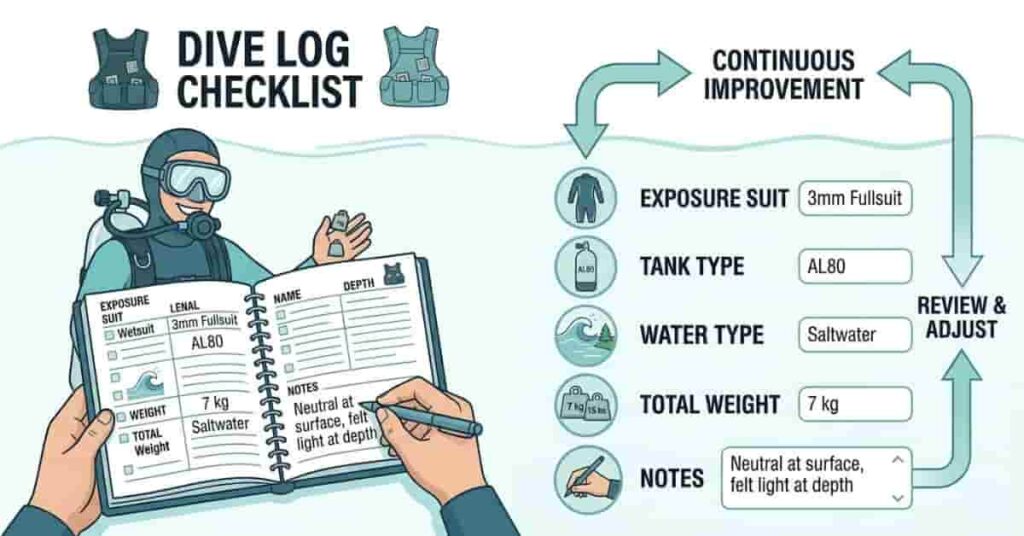
Experienced divers rarely depend on a single formula. Instead, they build a repeatable system based on observation, consistency, and records.
The scuba weight calculator thumb rule may help create a starting estimate, but experienced divers improve accuracy by tracking what actually works in the water. Over time, this approach removes guesswork and creates more predictable buoyancy.
The goal is simple: repeat successful conditions whenever possible.
Logging Successful Setups
One of the most useful habits experienced divers develop is keeping a weight record.
After each dive, they note the conditions and final adjustments that produced comfortable buoyancy. This creates a personal reference that becomes more reliable than repeating a general scuba weighting formula.
Even small notes become valuable after several dives.
Environment-Specific Records
Weighting often changes between locations.
A setup that feels perfect in warm ocean water may not work in a freshwater lake or a colder environment.
Experienced divers record conditions separately instead of assuming one number fits everywhere.
Examples include:
- Tropical ocean dives
- Freshwater training dives
- Quarry practice sessions
- Cold-water trips
Environment-specific records make future planning easier and reduce the time required for adjustments.
Equipment Consistency
Reliable weighting becomes easier when equipment stays consistent.
Changing BCDs, tanks, exposure systems, and accessories all affect buoyancy. Experienced divers often reduce unnecessary variables whenever possible.
Consistency allows better comparison between dives and faster improvements.
This does not mean using identical gear forever. It means tracking changes carefully.
Building a Repeatable Weighting System
Over time, experienced divers create their own repeatable process.
A common approach looks like this:
- Start from the last successful setup.
- Adjust for exposure protection.
- Confirm tank type
- Enter water and perform a buoyancy check.
- Record final changes
This method creates dependable results and supports long-term buoyancy improvement.
Fine Adjustments Over Time
Experienced divers usually avoid large corrections.
Instead of adding or removing a lot of weight at once, they make gradual changes and observe the result. Small adjustments make it easier to identify what actually improved buoyancy.
Many divers eventually refine their setup to the point that weighting becomes predictable under similar conditions.
Example Dive Log Fields
| Field | Example |
| Exposure suit | 3mm full wetsuit |
| Tank type | Aluminum |
| Water type | Saltwater |
| Total weight | Personal final setup |
| Notes | Comfortable at safety stop |
Conclusion
The 10% rule remains a helpful way to begin scuba weighting, but it was never meant to deliver a perfect answer. As you’ve seen, real buoyancy depends on more than body weight. Equipment, exposure protection, water conditions, and diving experience all influence the final setup.
The scuba weight calculator thumb rule works best as a starting estimate, not a fixed formula. A proper buoyancy check and small in-water adjustments create safer, easier, and more comfortable dives. Over time, your personal records become more valuable than any general scuba diving weight rule of thumb.
Start simple, test carefully, and keep improving after each dive.
Before your next dive, record your final setup and compare the results. If this guide helped, share it with another beginner diver or explore more scuba buoyancy resources on the site.

Scuba Diving Researcher & Beginner Guide
Evan Calder is the creator of DiveBeginner, a website dedicated to helping beginners learn scuba diving simply and practically 🌊
He focuses on scuba fundamentals, beginner safety, and clear diving guidance. Evan has studied ocean and marine science through programs at the Scripps Institution of Oceanography, UC San Diego, a globally recognized leader in ocean research.
Instead of complex technical language, Evan provides easy-to-follow, beginner-friendly guides based on real-world research, helping first-time divers feel confident before their first dive 🤿
DiveBeginner reflects his passion for making scuba diving accessible, safe, and enjoyable for everyone.