
Introduction
Ever switched scuba tanks and wondered why your perfect weighting suddenly felt completely wrong underwater?
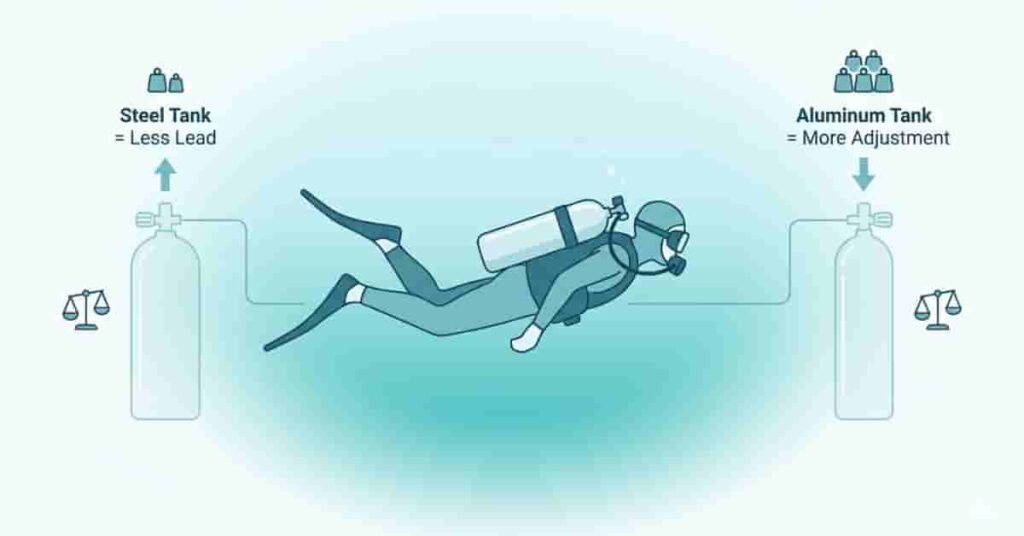
Many beginner divers assume their lead setup stays the same from dive to dive. In reality, tank choice can significantly change buoyancy, trim, and overall comfort in the water. A simple switch from aluminium to steel may mean carrying more lead, less lead, or redistributing weight entirely. That’s why experienced divers often use a scuba tank weight calculator while still understanding the basics of manual weighting.
The confusion becomes even more common with rental equipment across popular U.S. dive destinations, where tank types can vary between operators. Two divers with the same body size and wearing the same exposure suit may still need different amounts of weight because scuba cylinders behave differently underwater.
In this guide, you’ll learn exactly how tank type affects scuba weighting, including steel vs aluminium scuba tank buoyancy, end-of-dive buoyancy changes, trim adjustments, and practical weighting strategies. By the end, you’ll know how to choose and adjust your weighting with more confidence and enjoy safer, more comfortable dives.
Why Scuba Tank Type Matters for Weighting
Many beginner divers focus only on body weight when setting up their dive gear. That seems logical at first, but underwater buoyancy works differently. Your total weighting depends on the entire dive system, not just the diver.
Underwater buoyancy comes from several factors working together. Your exposure suit, body composition, equipment setup, and scuba cylinder all affect whether you float, sink, or stay neutrally buoyant. This is why two divers with similar body sizes may still need different amounts of lead.
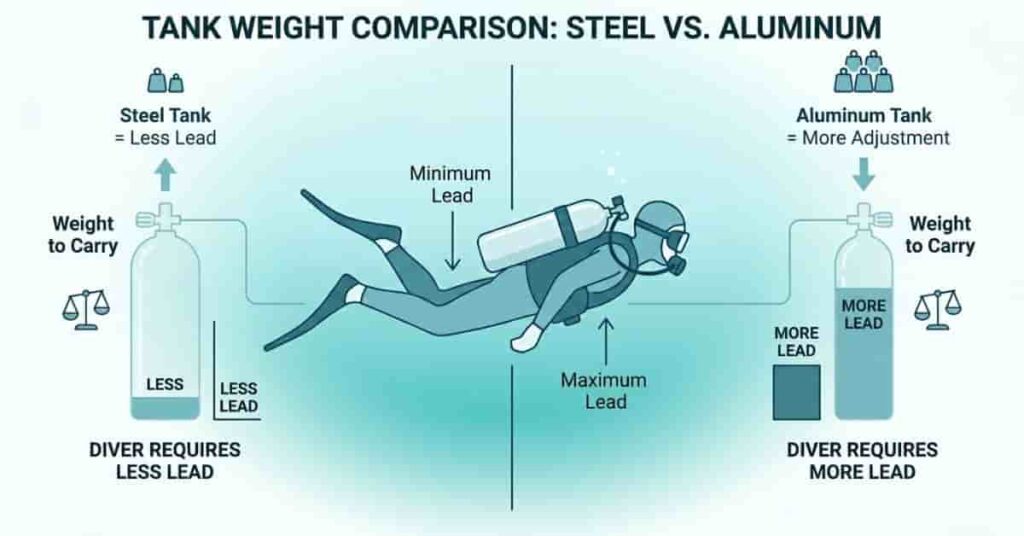
A scuba tank plays a bigger role than many new divers expect. Every cylinder has a different in-water buoyancy profile. Some tanks remain negatively buoyant underwater, meaning they naturally sink and reduce lead requirements. Others become more positively buoyant as gas is used during the dive and may require additional weighting.
This difference explains why tank type affects scuba weight, an important skill to understand. A steel cylinder and an aluminium cylinder can feel very different even when they appear similar on land.
A common beginner mistake is assuming that body weight alone determines weighting. In reality, proper weighting should account for tank behaviour at the end of the dive, when less gas remains inside the cylinder.
Getting the weighting right improves more than comfort. Proper weighting helps maintain trim, supports controlled ascents, reduces unnecessary effort, and may improve air efficiency by helping divers stay relaxed underwater.
Expert Tip: Perform your buoyancy check under near-empty-tank conditions whenever possible. This gives a more realistic weighting result for the entire dive.
Want a faster starting point? Try the Scuba Tank Weight Calculator to estimate your setup before your next dive, then fine-tune it with a real buoyancy check.
Understanding Scuba Tank Buoyancy Basics
Many new divers compare scuba tanks by dry weight and assume the heavier tank always sinks more underwater. That idea can lead to poor weighting decisions. To understand scuba tank buoyancy differences, you need to look beyond the number printed on the cylinder.
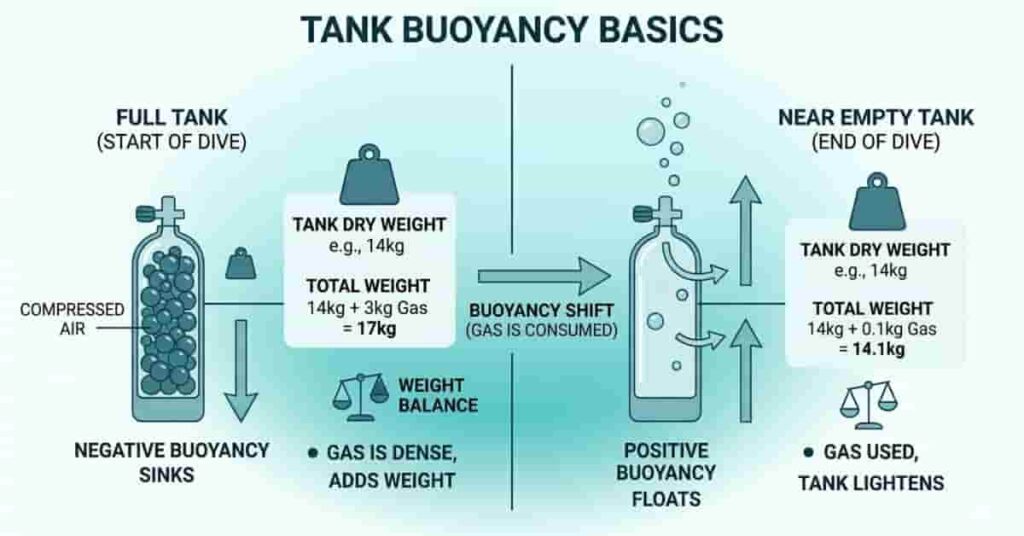
Dry weight tells you how heavy a tank feels on land. In-water weight tells you how the tank behaves once submerged. These values are not the same. A tank that feels heavy out of the water may become much less negative underwater, while another may stay consistently negative throughout the dive.
Tank buoyancy also changes as you breathe. A full scuba cylinder contains compressed gas, and that gas has mass. As you use air during the dive, the cylinder becomes slightly lighter. This change affects your overall buoyancy and explains why weighting should always consider end-of-dive conditions.
Some cylinders show bigger buoyancy shifts than others. This is a key reason divers compare the buoyancy of steel vs aluminium scuba tanks before adjusting lead.
Buoyancy affects more than floating and sinking. It also changes your centre of gravity and trim underwater. The centre of gravity describes how weight is distributed through your body and gear setup. Trim describes your body position in the water. If a tank becomes more buoyant during the dive, your body position can shift, making it harder to maintain a flat, comfortable posture.
Near the end of the dive, buoyancy changes become more noticeable because less breathing gas remains inside the cylinder. Divers who start with too much lead often feel heavy during most of the dive. Divers with too little lead may struggle to stay comfortably submerged during safety stops.
Understanding these basic buoyancy changes makes weighting more predictable and helps create a safer, more controlled diving experience.
Buoyancy Characteristics of Aluminium Scuba Tanks
Aluminium scuba tanks are common at resorts and training destinations across the United States, but their underwater behaviour often surprises new divers. Many beginners expect a tank to stay the same throughout the dive. In reality, aluminium cylinders gradually become more buoyant as breathing gas is used.
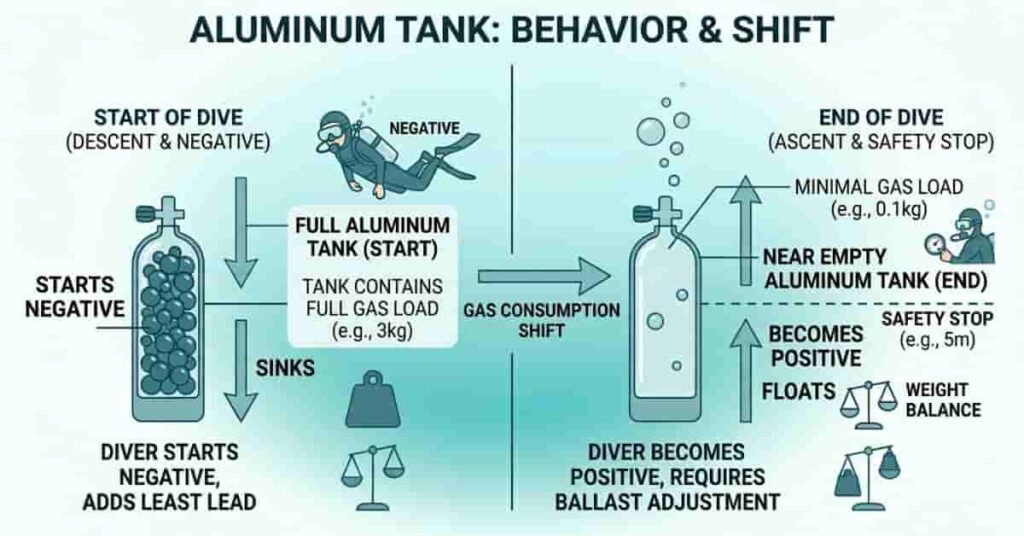
This happens because compressed gas has weight. At the start of the dive, a full aluminium tank contains more mass and feels more negatively buoyant. As you breathe and reduce the gas inside the cylinder, the tank becomes lighter. By the end of the dive, some aluminium tanks can move closer to neutral or slightly positive buoyancy depending on the model and overall setup.
This changing buoyancy is one reason divers researching steel vs aluminium scuba tank buoyancy often notice different lead requirements between tank types.
Because aluminium tanks become more buoyant when nearly empty, divers frequently carry additional lead to maintain control during safety stops and in shallow water. The goal is not to stay heavy during the entire dive. The goal is to remain comfortably neutral near the end of the dive.
This setup is especially common in warm-water locations where divers wear thinner exposure protection. Tropical resorts also commonly use aluminium cylinders because they are widely available and practical for rental operations. That means travel divers should avoid assuming their home weighting will transfer directly to vacation dives.
Switching from aluminum to steel? Use the Scuba Tank Weight Calculator to get an initial weighting estimate and reduce guesswork underwater.
Example: Typical AL80 Weighting Scenario
A diver who normally uses a steel cylinder may switch to an AL80 rental tank during a tropical trip. Even with the same wetsuit and body weight, that diver may need additional lead to stay neutrally buoyant near the end of the dive. The exact amount varies by diver, exposure protection, and equipment setup, so perform a buoyancy check instead of copying another diver’s numbers.
Buoyancy Characteristics of Steel Scuba Tanks
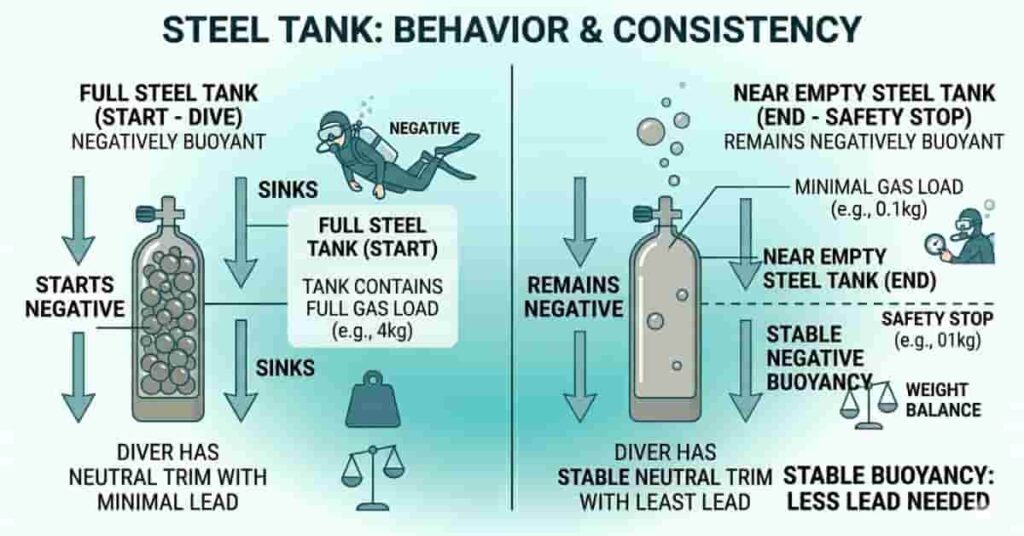
Steel scuba tanks feel different underwater than aluminium tanks, and that difference can change your entire weighting setup. Many divers choose steel cylinders because they usually remain negatively buoyant throughout the dive instead of becoming noticeably positive near empty.
Steel tanks hold compressed gas like any other cylinder, so buoyancy still changes as gas is used. However, the tank material and design often allow steel cylinders to stay more consistently negative underwater. That means divers usually experience smaller buoyancy shifts from the beginning to the end of the dive.
Because of this behaviour, many divers need less lead when switching to steel tanks. The cylinder itself contributes more negative buoyancy to the overall dive system. This is one reason why tank type affects scuba weight, which becomes important when changing equipment.
Another advantage is stability. Since steel tanks typically show smaller buoyancy changes during the dive, maintaining trim and neutral buoyancy often feels more predictable. Many divers find it easier to stay balanced during safety stops and shallow sections.
Steel cylinders are especially popular in cold-water environments. Thicker exposure protection creates more positive buoyancy, so the extra negative buoyancy from steel tanks may reduce the amount of lead needed. Technical divers also commonly use steel cylinders because stable weighting becomes more important as equipment complexity increases.
Recreational divers also use steel tanks, especially those who dive locally and want a more consistent setup across dives.
Example: Typical HP100 or Steel 120 Weighting Scenario
A diver who normally uses an AL80 may switch to an HP100 or Steel 120 and discover that their usual lead setup feels too heavy. Even with the same exposure suit, the steel cylinder may reduce the required lead. Exact adjustments vary by diver and equipment, so perform a buoyancy check rather than making fixed assumptions.
Steel vs Aluminum Scuba Tanks (Complete Comparison)
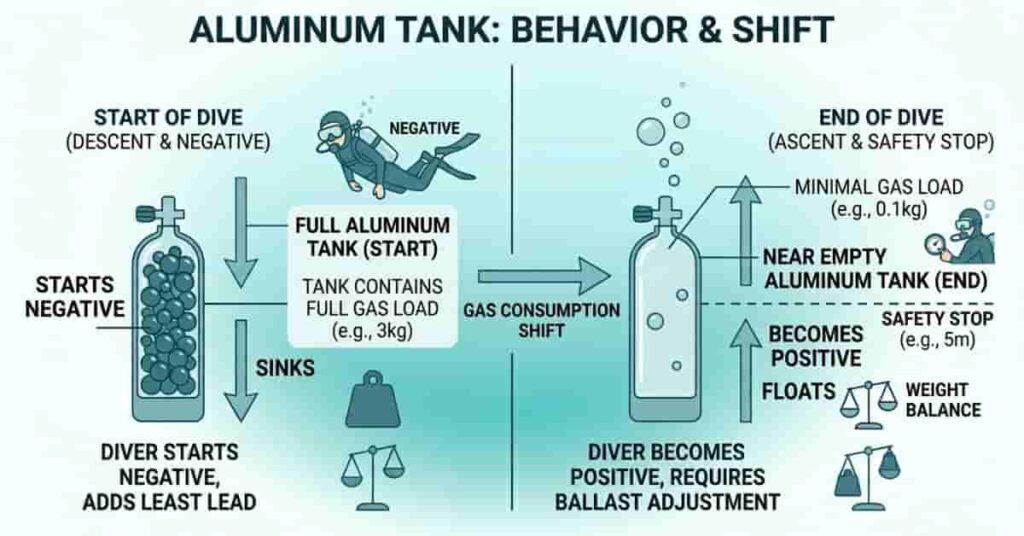
Choosing between steel and aluminium scuba tanks is not about finding a universally better option. The right choice depends on buoyancy goals, diving conditions, travel plans, and personal comfort underwater. Understanding the buoyancy of steel vs aluminium scuba tanks helps divers make smarter weighting decisions and avoid unnecessary lead.
One of the biggest differences appears underwater, not on land. A tank’s dry weight only tells part of the story. In-water behaviour affects buoyancy, trim, and the stability of your setup from descent to safety stop.
| Feature | Steel Scuba Tanks | Aluminum Scuba Tanks |
| Dry Weight | Often feels heavier on land | Often feels lighter on land |
| In-Water Buoyancy | Usually remains negatively buoyant | Often becomes more buoyant as gas is used |
| Weight Requirements | Often requires less additional lead | Often requires more lead |
| Trim Characteristics | More stable and consistent for many divers | May shift more near end of dive |
| Corrosion Resistance | Requires proper care to prevent rust | Naturally resists rust but still needs maintenance |
| Travel Friendliness | Less convenient for frequent travel | Common for resort and travel diving |
| Cost Considerations | Pricing varies by region and model [placeholder] | Pricing varies by region and model [placeholder] |
| Best Diving Environments | Cold water, local diving, technical setups | Warm water, training, resort rentals |
Steel tanks often appeal to divers seeking predictable buoyancy and reduced lead exposure. Many cold-water divers prefer this setup because thick exposure protection already creates extra positive buoyancy.
Aluminium tanks remain extremely popular for recreational diving and travel. Rental fleets commonly use aluminium cylinders, which makes them familiar to new divers and vacation divers.
Neither tank automatically improves diving performance. The better choice is the one that matches your environment, exposure suit, and weighting needs. If you change tank types, reassess your weighting instead of reusing previous lead amounts.
Scuba Tank Buoyancy Reference Table (Quick Guide)
Scuba tank labels tell you size and material, but they do not tell the full buoyancy story. Two tanks with similar capacities can behave very differently underwater. That difference affects lead requirements, trim, and end-of-dive comfort.
Use this quick reference as a starting point, not a replacement for an actual buoyancy check. Exact buoyancy varies by manufacturer, cylinder design, valve type, and attached equipment.
| Tank Type | Full Buoyancy | Near Empty | Typical Lead Effect |
| AL63 | Slightly negative to near neutral | Often trends more positive | May require additional lead |
| AL80 | Negative at dive start | Often approaches neutral or slightly positive | Commonly requires extra lead compared with steel |
| HP100 (Steel) | Negative | Usually remains negative | May reduce lead requirements |
| LP95 (Steel) | Negative | Typically stays negative | Often allows less added lead |
| Steel 120 | More negative than many recreational cylinders | Usually remains negative | May noticeably reduce lead needs |
| Other Recreational Aluminum Cylinders | Varies by model | Often becomes more buoyant | Recheck weighting when switching |
| Other Recreational Steel Cylinders | Varies by model | Usually stays more stable | Lead needs often stay lower |
A useful pattern emerges quickly: aluminum cylinders typically exhibit larger buoyancy changes during the dive, while steel cylinders often remain more consistent. This is one reason divers researching scuba tank buoyancy differences often adjust lead when changing tank types.
Do not use another diver’s numbers as your starting point. Body composition, exposure protection, and equipment setup all change total weighting. Even identical tanks may feel different across dive conditions.
If you use a scuba tank weight calculator, treat it as a planning tool. Confirm the result with a real buoyancy check near the end of the dive.
Expert Tip: Keep a simple note after every dive with tank type, exposure suit, location, and final lead amount. That record becomes more valuable over time.
Not sure how much lead to carry? Enter your dive setup into the Scuba Tank Weight Calculator and build a more confident starting plan.
How to Calculate Weight Changes Based on Tank Type
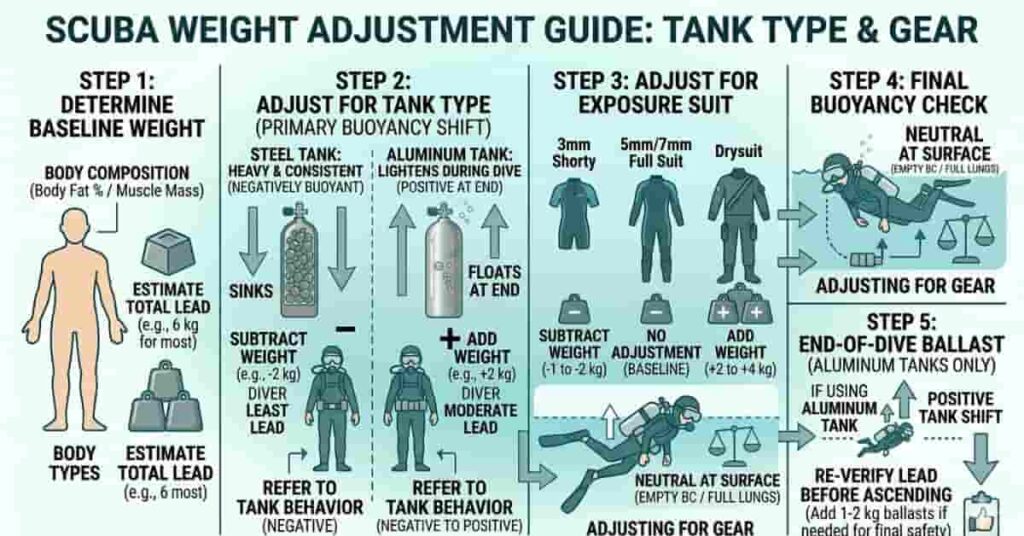
Changing scuba tanks should never mean having to guess your lead setup. A small change in equipment can affect buoyancy more than many beginners expect. The safest approach is to adjust one variable at a time and confirm results in the water.
You can use a scuba tank weight calculator to speed up planning, but understanding the process helps you make better decisions when rental gear or conditions change.
Simple Weighting Formula
Estimated Total Weight = Baseline Body Weighting + Tank Adjustment + Exposure Protection Adjustment + Gear Adjustment
This formula gives a starting point only. Always confirm with an actual buoyancy check.
H3: Step 1 — Establish Baseline Body Weighting
Start with the amount of weight that allows comfortable neutral buoyancy in familiar conditions. Use a known setup if possible.
Your baseline should assume:
- Your normal exposure suit
- Familiar water conditions
- Standard equipment configuration
- Near-end dive conditions
Avoid copying another diver’s numbers. Body composition and equipment choices significantly affect buoyancy.
H3: Step 2 — Adjust for Tank Material
Next, account for cylinder buoyancy.
Steel and aluminum tanks behave differently underwater. Steel cylinders often remain more negatively buoyant and may reduce the need for lead. Aluminum cylinders commonly become more buoyant near empty and may require additional lead.
Do not apply fixed numbers to every tank model. Check cylinder specifications and test in real conditions.
Example:
A diver changes from an AL80 rental setup to an HP100. Their previous lead amount may feel heavy because the steel tank contributes more negative buoyancy.
H3: Step 3 — Account for Exposure Protection
Your exposure suit can change in weight as much as the tank.
Thicker thermal protection traps more air, increasing positive buoyancy. Cold-water divers usually need more lead than warm-water divers.
Review:
- Rash guard or minimal protection
- Thin wetsuits
- Thick wetsuits
- Drysuit configurations
Adjust the weighting only after considering both the tank and the suit together.
Pro Tip: Change one variable at a time when testing weighting.
H3: Step 4 — Estimate End-of-Dive Buoyancy
Many divers weigh themselves at the start of the dive rather than at the end.
As you breathe, gas leaves the cylinder, and total system weight decreases. This change matters most when using aluminum cylinders.
Estimate whether you can remain comfortably neutral during a safety stop with low remaining gas. If not, reassess your setup.
Mini Example Calculation:
Baseline setup → neutral with previous equipment
Tank adjustment → increase or decrease based on cylinder behavior
Exposure adjustment → modify for suit changes
Final result → confirm in water
Use estimates only as a starting point.
H3: Step 5 — Verify with Final Buoyancy Check
The final buoyancy check is where theory becomes useful.
Near the end of the dive, hold a relaxed position at shallow depth while breathing normally. Your setup should allow controlled buoyancy without excessive effort.
If you float too easily, adjust gradually on the next dive. If you sink too aggressively, reduce the lead carefully.
This final step turns a planned weighting estimate into a reliable personal setup.
Tank Capacity and Its Impact on Weighting
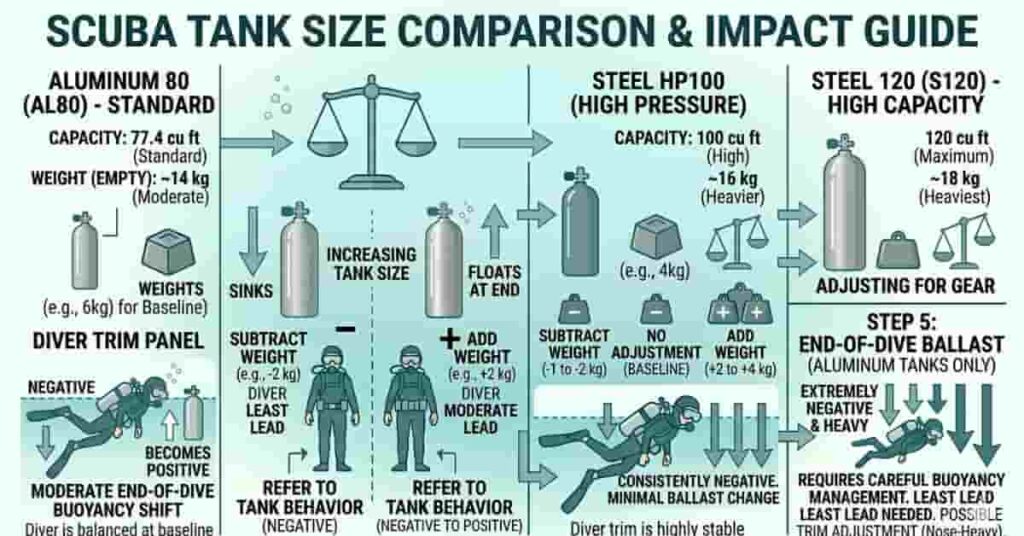
Tank material affects buoyancy, but tank capacity matters too. Many divers focus only on steel versus aluminum and miss another important factor: cylinder size. A larger tank can change buoyancy behavior, trim, and total lead requirements even when the material stays the same.
Tank capacity refers to how much breathing gas a cylinder holds. More gas means more mass at the start of the dive. As that gas is used, the total dive system gradually becomes lighter. This is why cylinder volume can influence both beginning and end-of-dive buoyancy.
A good example is comparing an AL80 and an HP100. Even though both are common recreational choices, they do not behave identically underwater. The HP100 often provides a more stable buoyancy profile and may reduce the need for added lead, while the AL80 commonly shows a larger buoyancy change during the dive.
The same idea applies to LP95 and Steel 120 cylinders. A larger steel cylinder can increase the system’s negative buoyancy and shift the trim placement on your back. Divers switching to higher-capacity tanks should reassess their weighting rather than assuming their previous setup still works.
Additional cylinders also affect buoyancy planning.
- Stage cylinders: Extra cylinders carried beside the main tank. They increase total system weight and can shift trim during the dive.
- Pony bottles: Smaller backup cylinders that add weight and change balance depending on placement.
- Multi-cylinder configurations: Twin sets or technical setups create larger buoyancy changes and often require separate weighting strategies.
For beginner divers, the safest approach is simple: treat every change in tank size as a new equipment setup. Start conservatively and confirm weighting in the water.
End-of-Dive Buoyancy Changes (Most Divers Miss This)
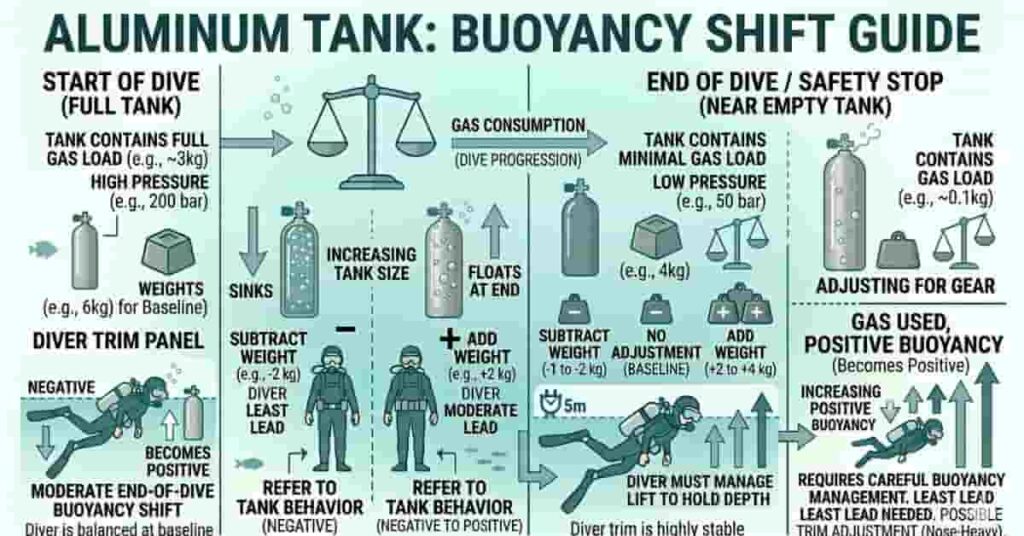
Many weighting mistakes do not show up at the start of the dive. They appear near the end, when the tank contains less gas and changes in buoyancy become easier to notice. This is one of the most overlooked parts of scuba weighting.
Every breath slightly reduces the total mass of your dive system. Compressed breathing gas has weight, so as gas leaves the cylinder, the tank becomes lighter. That change affects your overall buoyancy and can make a setup feel very different during the final part of the dive.
This effect becomes more noticeable with aluminum cylinders. Aluminum tanks often move closer to neutral or slightly positive buoyancy as they empty. That change can surprise divers who were comfortable earlier in the dive but suddenly struggle to stay level during shallow water stops.
End-of-dive buoyancy matters most during the safety stop. If you are too lightly weighted, staying comfortably submerged may require constant kicking or frequent air dumping. If you carry too much lead, you may add unnecessary air to your BCD, creating larger buoyancy swings.
Poor weighting can also increase the chance of faster or less controlled ascents. As buoyancy becomes more positive, maintaining depth control requires more attention and adjustment.
The goal is not to be heavy underwater. The goal is to remain neutrally buoyant near the end of the dive while carrying a realistic amount of remaining gas.
Proper End-of-Dive Weighting Strategy
Use a simple process:
- Start with a known weighting setup.
- Consider tank material and cylinder size.
- Estimate how buoyancy will change as gas is used.
- Evaluate buoyancy during shallow-water conditions.
- Adjust lead gradually between dives.
This approach creates a more stable and predictable setup over time.
Expert Tip: If you consistently float upward during safety stops, review weighting before adding more air to your BCD.
How Tank Material Changes Trim Position
Proper weighting is not only about staying underwater. It also affects how your body sits in the water. This body position is called trim, and tank material can change it more than many beginner divers expect.
Trim refers to your balance underwater from head to feet. A well-balanced diver stays in a relaxed, mostly horizontal position. Poor trim can increase effort, disturb fin movement, and make buoyancy control harder.
Tank material influences trim because different cylinders place weight differently on your back. Steel tanks usually add more negative buoyancy and can create a different balance point than aluminum tanks. Even when the total lead remains the same, your body position may still change.
Tank balance becomes easier to notice during longer dives or safety stops. Some divers feel foot-heavy, while others drift into a head-up position.
A foot-heavy setup happens when too much weight sits lower in the system. Your legs drop, making it difficult to maintain a flat posture. Common causes include heavy fins combined with lower-positioned weight distribution.
A head-up trim issue often happens when weight sits too high or buoyancy shifts during the dive. Aluminum tanks can sometimes make this more noticeable near the end of the dive as buoyancy changes.
Small changes in tank positioning often improve trim faster than adding or removing lead.
Tank Positioning Adjustments
Try these adjustments gradually:
- Move the tank slightly higher on the BCD to reduce foot heaviness.
- Move the tank slightly lower if your upper body feels too heavy.
- Test one adjustment at a time.
- Recheck trim near the end of the dive.
Weight placement matters as much as total weight.
Weight Redistribution Methods
Instead of immediately adding lead, redistribute existing weight.
Common options include:
- Integrated weights: Main weight stored inside the BCD system. Simple and convenient for many recreational divers.
- Trim pockets: Smaller pockets placed higher or farther back to fine-tune body position.
- Adjusting accessory placement before changing the total lead.
Many divers discover their trim improves without increasing weight at all.
Common Scuba Weighting Mistakes When Changing Tanks
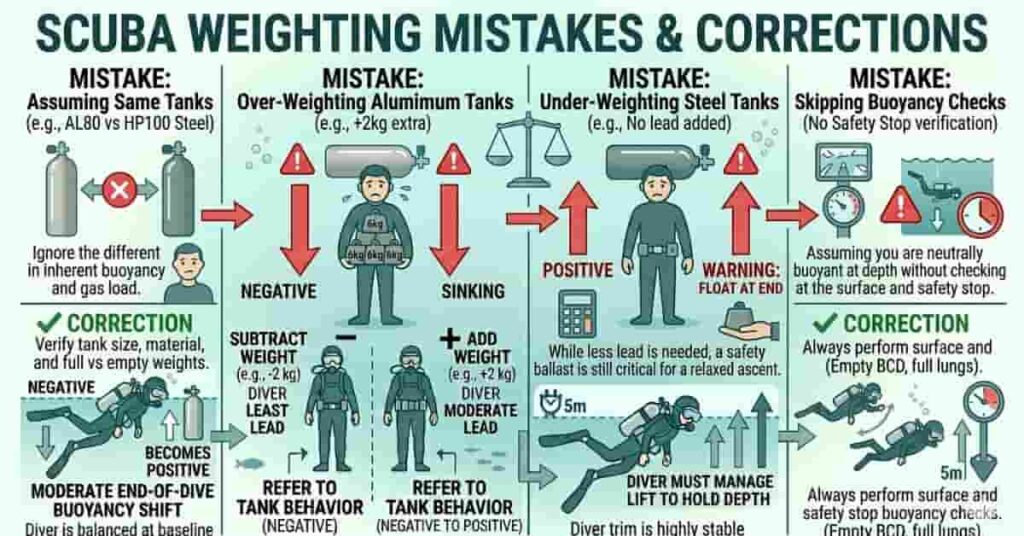
Changing scuba tanks may seem simple, but small assumptions can lead to uncomfortable or inefficient dives. Many weighting problems do not come from bad technique. They happen because divers carry habits from one tank setup to another.
Understanding how tank type affects scuba weight helps prevent common mistakes and creates more predictable buoyancy control.
H3: Assuming All Tanks Behave the Same
Many beginners believe tank size alone matters. In reality, cylinder material and buoyancy profile can change how a setup feels underwater.
Two tanks may look similar on land but behave differently during the dive. Steel and aluminum cylinders often change buoyancy at different rates, especially near the end of the dive.
H3: Overweighting Aluminum Tanks
Aluminum tanks often become more buoyant as gas is consumed. Some divers respond by adding too much lead at the start of the dive.
This can create a heavy feeling underwater and require extra air in the BCD throughout the dive. More weight does not automatically improve control.
Instead, aim for neutral buoyancy near the end of the dive.
H3: Underweighting Steel Tanks
Divers moving from aluminum to steel sometimes forget that steel cylinders often remain more negatively buoyant.
Reusing the same lead amount can leave the diver heavier than expected or affect trim and comfort. Small adjustments usually work better than major changes.
H3: Ignoring Empty Cylinder Buoyancy
Weighting decisions should not focus only on the first few minutes underwater.
As breathing gas decreases, buoyancy changes too. Aluminum cylinders usually show this shift more clearly, but all tanks change during the dive.
Ignoring end-of-dive conditions can lead to difficult safety stops and inconsistent buoyancy.
H3: Copying Another Diver’s Setup
A common beginner shortcut is using another diver’s lead amount.
This rarely works well because weighting depends on:
- Body composition
- Exposure protection
- Tank type
- Equipment configuration
- Diving conditions
Use recommendations as a starting point, not a final answer.
H3: Skipping Buoyancy Checks
Even experienced divers benefit from checking their weight after changing equipment.
A quick buoyancy check helps confirm whether your adjustments actually work. It also reduces repeated guessing across future dives.
Think of weighting as a process of refinement instead of finding one permanent number.
Best Weighting Strategies for Different Divers
There is no single “correct” scuba weighting setup. The best approach depends on where you dive, what equipment you use, and how your body and exposure protection affect buoyancy. A setup that works perfectly for one diver may feel completely wrong for another.
The goal is not to carry the least weight possible. The goal is to achieve comfortable buoyancy, stable trim, and predictable control throughout the entire dive.
H3: Warm-Water Travel Divers
Warm-water divers often wear thinner exposure protection, which usually reduces overall lead needs. However, many travel destinations use aluminum rental tanks, which often become more buoyant near the end of the dive.
Plan for:
- Lightweight exposure protection
- Aluminum cylinder behavior
- End-of-dive buoyancy checks
- Small lead adjustments between locations
H3: Cold-Water Recreational Divers
Cold-water setups usually include thicker exposure protection, which increases positive buoyancy.
Many cold-water divers prefer steel cylinders because they can reduce additional lead requirements and provide a more stable underwater balance.
Focus on:
- Exposure suit buoyancy
- Steel tank compatibility
- Balanced trim
- Controlled safety stops
Make small changes and test them across several dives.
H3: Technical Divers
Technical diving setups often include multiple cylinders and more equipment variables.
Weighting should support:
- Stable trim
- Controlled gas management
- Cylinder switching
- Consistent buoyancy through changing configurations
Technical divers often fine-tune weight placement instead of simply adding more lead.
H3: Beginner Divers
Beginners benefit most from simple, repeatable setups.
Avoid changing multiple variables at once. Learn how your tank, exposure suit, and body position affect buoyancy before experimenting with advanced adjustments.
Helpful habits:
- Keep a dive log
- Perform buoyancy checks
- Use gradual adjustments
- Prioritize comfort over numbers.
H3: Female Divers
Weighting needs vary widely among individual divers and should never be based on gender alone.
Instead, focus on:
- Body composition
- Exposure protection
- Tank type
- Trim preferences
- Equipment fit
Many divers improve comfort more through weight distribution than through changes in total lead weight.
H3: Rental Equipment Divers
Rental equipment creates one of the most common causes of weight changes.
Different BCDs, cylinders, and accessories can alter balance underwater. Treat each rental setup as a fresh starting point.
Before diving:
- Confirm tank type
- Check exposure protection
- Perform a buoyancy test.
- Adjust conservatively
A few minutes of setup time can prevent an uncomfortable dive.
Rental Tank Considerations While Traveling
Travel diving can make weighting feel unpredictable, even for experienced divers. You may arrive with a proven setup and discover it no longer feels balanced underwater. In many cases, the issue is not your skills. It is the rental equipment.
One of the biggest differences comes from resort cylinder choices. Many warm-water destinations commonly use aluminum rental tanks because they are widely available and practical for high guest turnover. Divers who normally use steel tanks at home may notice immediate changes in buoyancy and trim.
Regional differences can also affect weighting. Some destinations favor larger recreational cylinders, while others use different tank materials or valve configurations. Exposure protection and water conditions add another layer of change.
Before your first dive, ask a few simple questions rather than assuming your usual setup will carry over.
Questions to Ask Dive Operators
- What tank type do you provide: steel or aluminum?
- What cylinder size is most common?
- Does equipment vary across dive sites?
- What exposure protection do most divers use?
- Do you recommend changing the lead from standard setups?
These questions often save more time than adjusting weight repeatedly underwater.
Rental gear can also influence weighting beyond the tank itself. Different BCD designs, integrated weight systems, and tank positioning may change trim and comfort. Even a familiar cylinder can feel different with unfamiliar equipment.
Quick Adjustment Checklist
Before entering the water:
✓ Confirm tank material and cylinder size
✓ Check exposure protection thickness
✓ Start with conservative weight changes
✓ Evaluate trim during descent
✓ Recheck buoyancy near the safety stop
✓ Log your final setup for future trips
A short adjustment process helps create more comfortable dives and reduces unnecessary guesswork.
Scuba Tank Weight Calculator vs Manual Weight Planning
A scuba tank weight calculator can save time, but it should not replace understanding how buoyancy works. Many divers want a quick number, especially when switching tanks or preparing for travel. The problem is that weighting is more personal than a simple input field.
Calculators work best as planning tools. Manual understanding turns those estimates into reliable real-world results.
Calculator Benefits
Weight calculators help create a starting point faster than trial and error.
Common advantages include:
- Faster setup estimates
- Easier comparison between tank types
- Helpful for travel planning
- Useful when changing exposure protection
- Better organization across multiple configurations
For beginners, calculators can reduce uncertainty and make equipment changes feel less overwhelming.
Manual Understanding Advantages
A calculator cannot feel what happens underwater.
Manual weighting knowledge helps divers understand:
- Why does buoyancy change during the dive?
- How trim shifts with different tanks
- When exposure protection changes, lead needs
- Why end-of-dive conditions matter
This understanding becomes especially valuable when using rental equipment or changing environments.
Common Calculator Limitations
Calculators can only estimate based on the information entered.
They often cannot fully account for:
- Individual body composition
- Equipment placement
- Trim preferences
- Different BCD styles
- Regional rental variations
- Personal breathing patterns
This is why copying calculated results exactly can create poor buoyancy control.
Think of the result as an informed estimate, not a final answer.
Best Hybrid Approach for Accuracy
The most reliable method combines both approaches.
Use this process:
- Start with a scuba tank weight calculator.
- Adjust for tank material and capacity.
- Consider exposure protection.
- Test trim and comfort underwater.
- Perform a final buoyancy check.
- Save successful configurations.
Over time, your personal dive notes often become more accurate than any calculator.
Real-World Weighting Examples
Theory becomes useful when you apply it in real dives. Weighting changes are most noticeable when you switch tank types, travel to new environments, or adjust exposure protection. These examples show how the type of tank affects scuba weight in practical situations.
H3: Switching from AL80 to Steel 100
A diver moving from an AL80 aluminum tank to a Steel 100 often notices a clear change in buoyancy and trim. The steel tank stays more negatively buoyant throughout the dive, which can reduce the need for extra lead.
In practice, this means the diver may feel slightly heavy at first if they keep the same weighting. The correct adjustment is usually a small reduction in lead, followed by a buoyancy check near the end of the dive.
H3: Tropical Vacation Setup
In warm-water travel diving, divers often use aluminum tanks with thin exposure protection, such as a rash guard or a 3mm wetsuit. Aluminum tanks tend to become more buoyant toward the end of the dive, which can affect safety stops.
A typical adjustment is adding a small amount of lead compared to steel-based home setups. However, conditions vary by resort, so divers should always test weighting on the first dive.
H3: Cold-Water Recreational Setup
Cold-water diving usually involves thicker wetsuits or drysuits. These suits add significant positive buoyancy, so divers often rely on steel tanks to reduce total lead requirements.
Even with steel cylinders, cold-water divers still fine-tune weight placement to maintain stable trim. The goal is not just neutral buoyancy but also comfortable horizontal positioning throughout the dive.
H3: Technical Backplate Configuration
Technical divers often use backplate and wing systems with steel cylinders or dual tanks. This setup changes buoyancy distribution across the diver’s body.
Instead of focusing only on total lead, technical divers adjust:
- Tank position
- Backplate weight
- Trim pockets
- Stage cylinder placement
Small changes can significantly improve stability, especially during gas switches and longer dives.
H3: Rental Tank Adjustment Example
A diver traveling to a new location receives an aluminum rental tank instead of their usual steel setup. Even if everything else remains the same, buoyancy changes near the end of the dive are noticeable.
The diver may need slightly more lead than at home. The safest approach is to start conservatively, perform a buoyancy check, and adjust gradually over the next dives rather than guessing up front.
Quick Checklist Before Every Dive
A consistent pre-dive routine helps prevent weighting issues and improves overall safety underwater. Even small changes in equipment or conditions can affect buoyancy, so a quick checklist keeps your setup predictable and controlled.
This step becomes especially important when switching between different tanks, such as aluminum and steel cylinders. It also helps reinforce awareness of how tank type affects scuba weight before entering the water.
Before every dive, run through this simple checklist:
- Tank material confirmed
- Exposure suit checked
- Weight adjusted for current setup.
- End-of-dive buoyancy considered
- Trim is evaluated in the water.
- Final buoyancy test completed.
Each step helps you confirm that your setup matches real conditions, not assumptions. Many divers skip these checks when diving familiar sites, but even small changes like a different rental tank can affect balance and control.
A quick buoyancy test near the surface is especially important. It confirms whether you can stay comfortably neutral without excessive effort from your BCD or fins. This final check is the most reliable way to catch weighting issues before they affect the dive.
Conclusion
In this guide, you learned how tank type changes scuba weighting and affects real underwater buoyancy control. We covered differences between steel and aluminum, end-of-dive buoyancy shifts, trim impact, and practical weighting strategies for safer dives.
Your scuba tank weight calculator can help with planning, but real control comes from understanding how tanks behave in the water. Aluminum and steel scuba tanks should never be weighted the same because their buoyancy changes differently during a dive. End-of-dive conditions always matter more than starting conditions.
Good weighting improves trim, comfort, and overall safety underwater. Small adjustments can make a big difference in stability and air efficiency.
Share your experience with tank changes or weighting adjustments in the comments. You can also explore more scuba weighting guides on this site to build confidence on every dive.

Scuba Diving Researcher & Beginner Guide
Evan Calder is the creator of DiveBeginner, a website dedicated to helping beginners learn scuba diving simply and practically 🌊
He focuses on scuba fundamentals, beginner safety, and clear diving guidance. Evan has studied ocean and marine science through programs at the Scripps Institution of Oceanography, UC San Diego, a globally recognized leader in ocean research.
Instead of complex technical language, Evan provides easy-to-follow, beginner-friendly guides based on real-world research, helping first-time divers feel confident before their first dive 🤿
DiveBeginner reflects his passion for making scuba diving accessible, safe, and enjoyable for everyone.