Table of Contents
Introduction
Have you ever felt tilted, unstable, or constantly kicking to stay level underwater?
A proper scuba weight belt setup affects far more than your comfort. Even if you carry the correct amount of lead, poor weight placement can make buoyancy control difficult and throw off your trim. Many beginner divers in the USA focus on total weight but overlook how that weight is distributed across the body.
Good weight distribution helps you stay balanced, swim more efficiently, and reduce unnecessary effort underwater. It can also improve safety by making emergency weight release easier when needed. Whether you use a traditional weight belt or an integrated weight system, proper setup plays a major role in your overall diving experience.
In this guide, you’ll learn how to position dive weights correctly, improve scuba diving weight distribution, and avoid common setup mistakes. We’ll also compare weight belts and integrated systems, explain how different body types affect weighting, and share practical tips to help you achieve better trim, comfort, and buoyancy control on every dive.
Before adjusting your weight placement, make sure you’re carrying the right amount of lead.
Try our Scuba Diving Weight Calculator to get a personalized weight estimate and build a more balanced, comfortable setup underwater.
Why Proper Scuba Weight Distribution Matters
Many divers focus on how much weight they carry. However, where that weight sits on the body is just as important. Even a perfect weight calculation can lead to problems if the weight is placed incorrectly.
A balanced scuba weight belt setup helps you maintain a comfortable position underwater. It also improves buoyancy control, reduces effort, and makes diving safer. Whether you use a traditional weight belt or an integrated system, proper scuba diving weight distribution can significantly improve your overall dive experience.
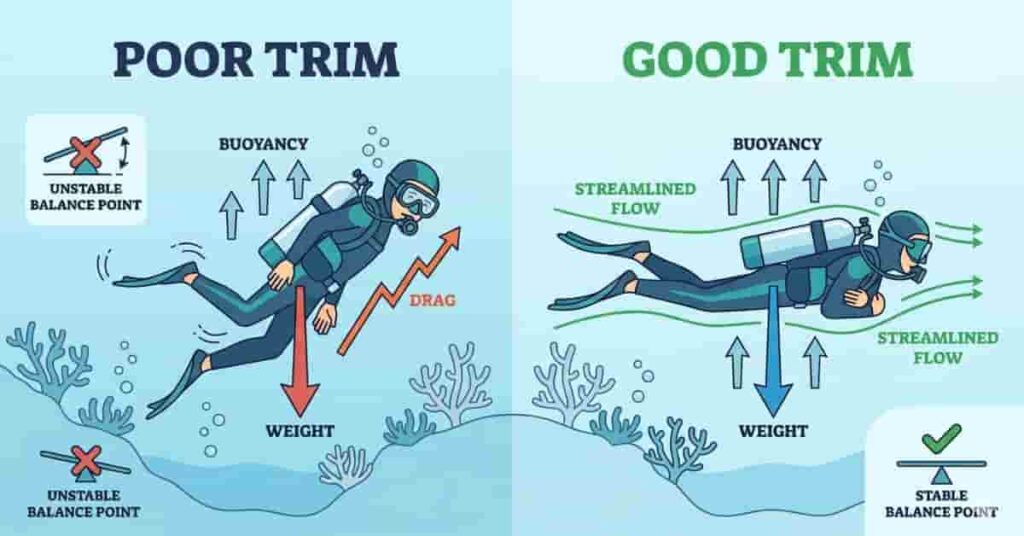
One of the biggest benefits is better horizontal trim. When your body stays level in the water, you create less drag and move more efficiently. This position also helps protect reefs and prevents accidental contact with the bottom.
Good weight placement also improves buoyancy efficiency. Instead of constantly adjusting your BCD or kicking to stay balanced, you can maintain a stable position with less effort. Small improvements in trim often make buoyancy control feel much easier, especially for newer divers.
Proper distribution may also help reduce air consumption. Divers who stay streamlined and relaxed often waste less energy underwater. Less unnecessary movement can lead to more efficient breathing and longer dives.
Comfort is another major advantage. Uneven weight placement can put extra pressure on your hips, lower back, and shoulders. Distributing weight evenly across the body helps reduce strain during both the dive and surface intervals.
Safety should never be overlooked. A correctly positioned weight belt allows for a smooth emergency release if weight ditching becomes necessary. Poorly placed weights can shift, twist the belt, or make quick removal more difficult.
Finally, balanced weighting improves finning efficiency. When your body stays level, each kick generates more forward movement. You spend less energy fighting your position and more time enjoying the dive.
Expert Tip
Many experienced dive professionals make small weight-placement adjustments before adding or removing lead. A minor shift of just a few pounds can often solve trim problems without increasing total weight.
Understanding Scuba Weight Belt Basics
Before adjusting weight placement, it’s important to understand where dive weights can be carried. Modern divers have several options beyond the traditional weight belt. Each system affects balance, comfort, trim, and emergency procedures differently.
Most recreational divers use a combination of weight locations rather than placing all their lead in one spot. This approach often results in better buoyancy control and a more streamlined underwater position. Understanding how each weight system works will help you build a safer and more comfortable scuba weight belt setup.
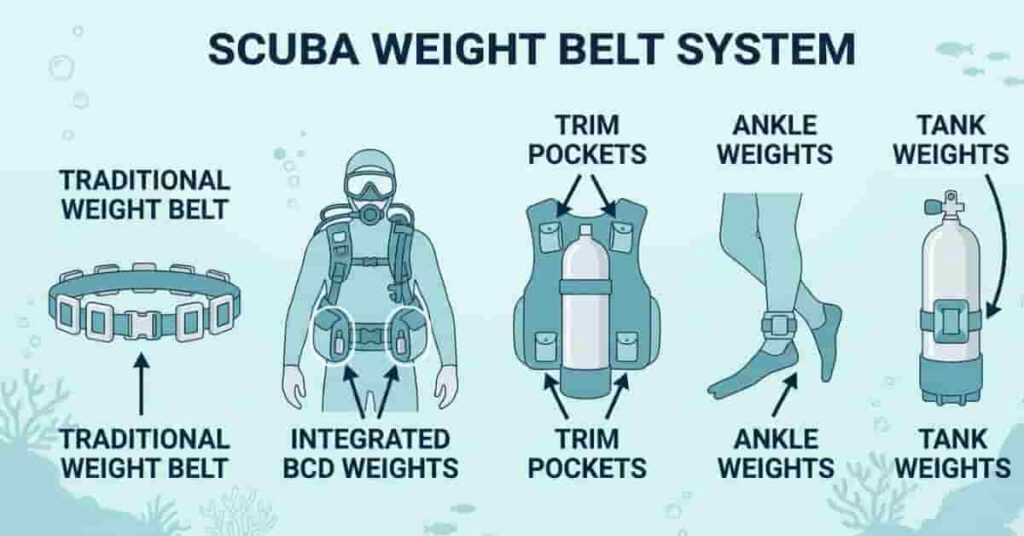
Traditional Weight Belts
Traditional weight belts remain one of the simplest and most reliable weighting systems. Divers slide lead weights onto a sturdy nylon or rubber belt and secure the belt around the waist with a quick-release buckle.
A weight belt offers several advantages. It is easy to adjust, works with almost any BCD, and allows for fast emergency weight release when necessary. Many dive professionals still prefer weight belts because of their simplicity and reliability.
However, poor placement can cause the belt to rotate, slide, or create discomfort around the hips. Distributing weights evenly on both sides usually provides better balance and comfort. The buckle should always remain easy to reach and release with one hand.
Integrated BCD Weights
Many modern BCDs include integrated weight systems. Instead of wearing a separate belt, divers place weight pouches inside dedicated pockets built into the BCD.
Integrated weights often improve comfort by spreading weight across the torso rather than concentrating it on the hips. They can also reduce lower back pressure and create a cleaner gear setup.
These systems are popular among beginner divers because they feel secure and comfortable. However, emergency release procedures vary by manufacturer. Divers should always practice removing weight pockets before entering the water.
Trim Pockets
Trim pockets are small weight compartments placed away from the main weight system. They are commonly located on the upper tank band, back of the BCD, or shoulder area.
The main purpose of trim pockets is balance, not adding large amounts of lead. Small adjustments in trim pockets can help correct common problems such as sinking feet or a head-heavy position.
Many divers discover that moving a small amount of weight into trim pockets improves their horizontal trim without changing total dive weight.
Ankle Weights
Ankle weights attach around the lower legs and add weight near the feet. They are typically used only when a diver’s legs float excessively.
While ankle weights can solve certain trim issues, they are not the best solution for most divers. Extra weight on the legs increases effort during finning and may reduce efficiency underwater.
Most buoyancy problems can usually be corrected through better overall weight distribution before resorting to ankle weights.
Tank Trim Weights
Tank trim weights attach directly to the scuba cylinder using specialized pouches or mounting systems. These weights move part of the load higher on the diver’s body.
Tank-mounted weights are often useful for divers whose feet tend to sink or who struggle to maintain a horizontal position. By shifting weight closer to the shoulders, they can improve overall balance and trim.
Many experienced divers use small tank trim weights to fine-tune their setup after determining their correct total weight.
Takeaways
- Traditional weight belts are simple, reliable, and easy to release.
- Integrated BCD weights improve comfort and reduce hip pressure.
- Trim pockets help fine-tune body position underwater.
- Ankle weights should only be used when necessary.
- Tank trim weights can improve balance and horizontal trim.
- Combining different weight locations often produces the best results.
How to Calculate Weight Placement on a Scuba Belt
Finding the right amount of lead is only the first step. Proper weight belt scuba calculation also involves deciding where that weight should sit on your body. Even a correctly weighted diver can struggle with trim and buoyancy if the lead is positioned poorly.
The goal is simple: create a balanced setup that keeps your body level and comfortable underwater. Small adjustments often make a bigger difference than adding extra weight.
Not sure how much lead you actually need?
Use our Scuba Diving Weight Calculator to estimate your ideal dive weight based on your body weight, wetsuit thickness, tank type, and diving conditions. Starting with the correct amount of weight makes proper distribution much easier.
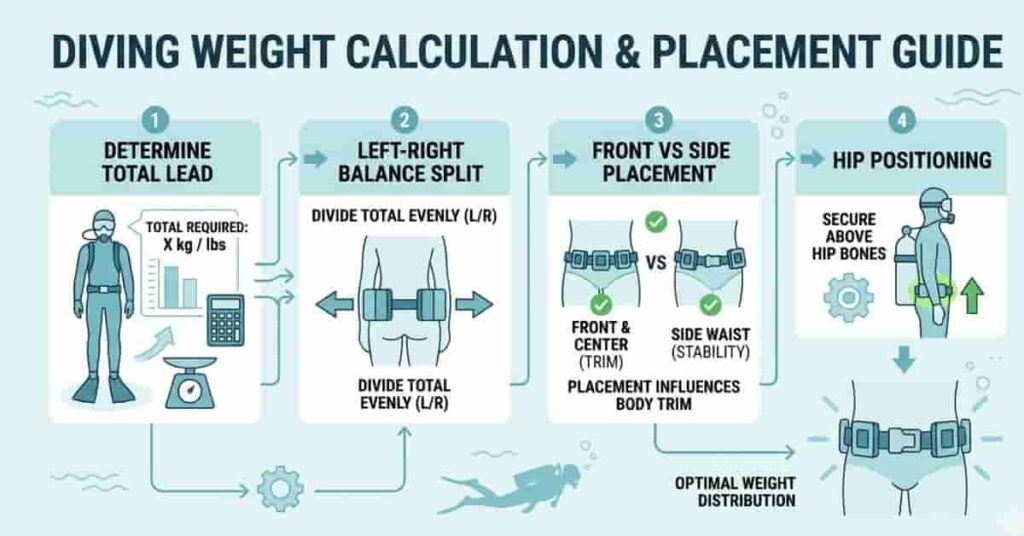
Determine the Total Required Lead
Before adjusting weight placement, confirm your total weighting needs. Your body composition, wetsuit thickness, tank type, and water conditions all affect how much lead you require.
If you have already completed a buoyancy check or used a scuba weight belt calculator, start with that number. Avoid adding extra weight “just in case.” Overweighting is one of the most common mistakes among beginner divers.
Once your total lead requirement is confirmed, focus on distribution rather than increasing weight.
Divide the weight for body balance.
Most divers achieve the best results when they split weight evenly between the left and right sides of the belt. Balanced loading helps prevent rolling and improves stability underwater.
For example, if you carry 10 pounds of lead, place roughly 5 pounds on each side. This creates a more symmetrical setup and reduces strain on one side of the body.
Keep enough space near the buckle so emergency release remains quick and unobstructed.
Front vs Side Positioning
Avoid placing most of your weight directly in front of your body. Excessive front loading can pull your torso downward and create discomfort around the waist.
Instead, position the majority of your lead slightly forward of the hips or along the sides. This placement usually creates better balance while maintaining easy access to the quick-release buckle.
Many divers fine-tune trim by moving individual weights a few inches at a time during practice dives.
Hip Placement
The hips are generally the most stable location for primary weights. Positioning the lead near the hips helps distribute weight evenly and keeps the belt secure during movement.
Weights placed too far forward may cause discomfort. Weights placed too far behind can affect balance and make adjustments more difficult.
A snug belt fit helps keep weights from shifting during the dive.
Adjust for Body Type
Every diver has a unique body shape and buoyancy profile. Lean divers often require different weight placement than larger divers. Women may also find that slight adjustments improve comfort and trim.
Divers whose feet sink may benefit from moving some of their weight higher with trim pockets or tank trim weights. Divers with floating legs should first review the overall distribution before adding ankle weights.
The best setup is the one that keeps your body relaxed, level, and easy to control underwater.
Expert Tip
Many experienced instructors adjust weight placement in small increments rather than adding more lead. Moving just 1–2 pounds can often solve trim problems that extra weight cannot.
Step-by-Step Scuba Weight Belt Setup Process
A good scuba weight belt setup starts before you enter the water. Even if you know how much lead you need, incorrect placement can affect trim, buoyancy, and comfort throughout the dive.
The best approach is to set up your belt systematically. By following a few simple steps, you can create a balanced configuration that feels stable and easy to manage underwater.
Weight distribution works best when your total weighting is accurate.
Use our Scuba Weight Calculator to calculate your recommended dive weight, then apply the setup techniques in this guide to improve trim and buoyancy control.
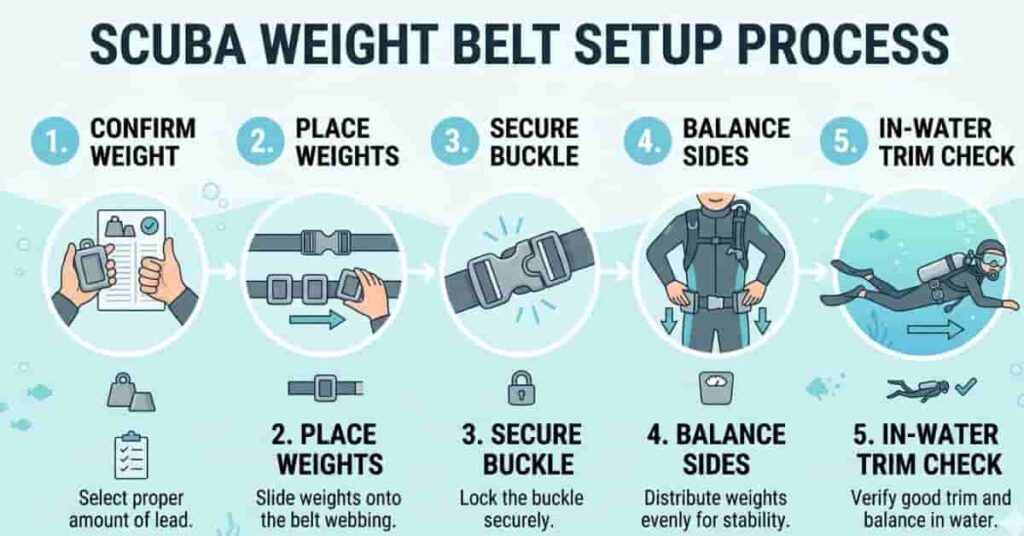
Step 1: Confirm Total Dive Weight
Start by verifying your total required lead. This number should account for your body weight, exposure suit, tank type, and whether you’re diving in fresh or salt water.
If you’ve recently changed gear, gained or lost weight, or switched wetsuits, perform a buoyancy check before adjusting placement. A proper weighting assessment provides the foundation for effective scuba diving weight distribution.
Remember that no amount of weight shifting can fully compensate for carrying too much or too little lead.
Step 2: Position Primary Weights
Place most of your weight around the hip area. This location typically provides the best balance and keeps the belt stable during movement.
Avoid clustering all weights in one section of the belt. Instead, spread them evenly while leaving enough space near the buckle for a clear emergency release.
If you use integrated weights, apply the same principle by distributing the weight evenly between the two pockets.
Step 3: Secure Quick-Release Correctly
The buckle should sit at the front of your body where it remains easy to locate and operate. Most divers position the release so it opens with a pull from the right hand, although training standards may vary.
Never cover the buckle with accessories, hoses, or additional gear. In an emergency, you should be able to release the belt quickly without having to search for the mechanism.
A snug fit is important, but the belt should not feel excessively tight or restrictive.
Step 4: Balance Left and Right Sides
Uneven loading can cause rolling, poor trim, and discomfort during the dive. Divide your lead as evenly as possible between both sides of the body.
For example, a diver carrying 12 pounds of lead would typically place 6 pounds on each side. Small adjustments may be necessary to accommodate individual body shape and equipment configuration.
Balanced weight placement often improves stability immediately.
Step 5: Perform an In-Water Trim Check
The final test happens underwater. Once neutrally buoyant, check whether your body remains level without excessive finning.
If your feet sink, consider moving some weight higher. If your head drops, shift a small amount of weight lower or farther back. Make only one adjustment at a time so you can clearly evaluate the results.
Many divers achieve their best trim after several small refinements rather than one major change.
Expert Tip
Professional dive instructors often record successful weight configurations in a dive log. Keeping notes on weight amount and placement makes future setup much faster and more consistent.
Weight Belt vs Integrated Weights: Which Is Better?
Many divers eventually face the same question: should you use a traditional weight belt or an integrated weight system? The answer depends on your diving style, comfort preferences, and equipment setup.
Both systems can work well when configured properly. Neither option automatically improves buoyancy or trim. The key is choosing the system that fits your needs and using it correctly.
Safety
Traditional weight belts have a simple design and a straightforward quick-release mechanism. Most divers can quickly locate and release the belt, even under stress.
Integrated weight systems are also designed for emergency release, but the process varies between BCD manufacturers. Divers should practice removing integrated weight pockets before every dive trip and whenever using unfamiliar equipment.
Comfort
Comfort is one of the biggest reasons divers switch to integrated weights. Instead of concentrating weight around the hips, the BCD distributes it across the torso.
Traditional weight belts can become uncomfortable during long dives, especially when carrying larger amounts of lead. However, many divers find them perfectly comfortable when fitted correctly.
Streamlining
Integrated systems often create a cleaner gear profile. With no separate belt around the waist, there is less equipment shifting during the dive.
A properly fitted weight belt can also be streamlined, but loose belts may rotate or move during entry and exit.
Emergency Release
Weight belts offer a simple one-step release. Pulling the buckle immediately drops the entire weight system.
Integrated systems may require releasing one or two weight pockets separately. While modern designs are reliable, divers should understand their specific release mechanism before entering the water.
Travel Convenience
Weight belts are lightweight, simple, and compatible with almost any rental BCD. Many travelling divers appreciate their versatility.
Integrated systems are convenient when using your own BCD but may not always be available on rental equipment. Divers who travel frequently often benefit from knowing how to use both systems.
Back Support
Integrated weights generally place less pressure on the lower back and hips. This can improve comfort during long walks to entry points or while standing with full gear.
Weight belts concentrate load around the waist, which may cause discomfort for some divers. Proper fit and balanced weight placement can help reduce this issue.
Quick Comparison
FeatureWeight BeltIntegrated Weights
Safety Simple design Depends on BCD design
Comfort Moderate Usually higher
Streamlining Good Often better
Emergency Release Very simple Requires system familiarity
Travel Convenience Excellent Best with personal BCD
Back Support Moderate Usually better
Common Scuba Weight Belt Mistakes

Even experienced divers occasionally struggle with weighting issues. In many cases, the problem is not the amount of lead being carried. Instead, it comes from poor weight placement or an improperly configured belt.
These mistakes can affect buoyancy control, trim, comfort, and safety. The good news is that most are easy to identify and correct with a few simple adjustments.
Overloading the Belt
One of the most common mistakes is carrying more lead than necessary. Many beginner divers add extra weight because they feel more secure underwater.
Unfortunately, overweighting creates new problems. It forces divers to add more air to their BCD, making buoyancy control less precise. It can also increase effort, air consumption, and lower back strain.
Always perform a proper buoyancy check before adding additional lead.
Uneven Distribution
Placing more weight on one side of the body often leads to poor balance underwater. Divers may find themselves rolling slightly left or right throughout the dive.
Uneven loading can also create discomfort on the surface and make trim more difficult to maintain. Dividing weight evenly between both sides is usually the best starting point.
Loose Fit
A weight belt that hangs loosely around the waist can shift during descents, ascents, or surface swims. As the belt moves, weight distribution changes and trim becomes less predictable.
The belt should fit snugly enough to stay in place while still allowing comfortable breathing and movement.
Incorrect Buckle Orientation
The quick-release buckle is a critical safety feature. If the buckle faces the wrong direction or becomes obstructed by equipment, releasing the belt during an emergency may be difficult.
Always ensure the buckle remains visible, accessible, and easy to operate with one hand.
Ignoring Trim Pockets
Many divers focus only on their main weight system and overlook trim pockets. Small trim adjustments can often solve balance issues more effectively than adding extra lead.
A few pounds moved to trim pockets may help correct floating feet, poor horizontal trim, or an unbalanced body position.
Using Ankle Weights Unnecessarily
Ankle weights can be useful in specific situations, but they should not be the first solution for trim problems.
Many buoyancy and balance issues can be corrected by adjusting the placement of weight on the belt, BCD, or tank. Adding weight to the ankles often increases finning effort and may reduce efficiency underwater.
Before using ankle weights, evaluate your overall weighting system and trim setup.
Expert Tip
If you experience trim problems, move existing weight before adding more lead. Small placement changes often solve issues that extra weight cannot.
How Wetsuit Thickness Affects Weight Belt Setup
Your wetsuit plays a major role in the weight distribution of scuba diving. As wetsuit thickness increases, buoyancy increases as well. This means you will usually need more lead and may need to adjust where that weight is placed.
Many divers focus only on adding extra weight when switching exposure suits. However, changing wetsuit thickness can also affect trim, comfort, and overall balance underwater. Understanding these differences helps you create a more effective scuba weight belt setup.
3mm Wetsuit
A 3mm wetsuit provides relatively little buoyancy compared to thicker suits. Divers in warm-water destinations often use this type of exposure protection.
Because less lead is typically required, weight distribution is usually straightforward. Most divers can place the majority of their weight around the hips and achieve good trim without additional adjustments.
A simple, balanced setup often works well in tropical diving conditions.
5mm Wetsuit
A 5mm wetsuit creates noticeably more buoyancy than a 3mm suit. Many recreational divers use this thickness for moderate water temperatures.
The additional buoyancy often requires extra lead. As total weight increases, proper distribution becomes more important. Concentrating all weight on one area may cause discomfort and affect trim.
Many divers find that spreading weight between a belt, integrated pockets, or trim pockets improves balance and comfort.
7mm Wetsuit
A 7mm wetsuit generates significant buoyancy, especially near the surface. Divers commonly use this thickness in colder water environments.
The added lead required for a 7mm suit can make a poorly configured setup uncomfortable. Extra weight around the waist may increase strain on the hips and lower back.
To improve trim, some divers move a small portion of their lead into trim pockets or tank-mounted weights rather than placing everything on the belt.
Drysuit Considerations
Drysuits introduce unique buoyancy characteristics because they contain both insulation and an air space around the body.
Most drysuit divers require additional lead compared to wetsuit divers, although exact requirements vary by suit type and undergarments. Weight placement often becomes just as important as total weight.
Many experienced drysuit divers distribute weight across multiple locations, including integrated systems, trim pockets, and tank weights. This approach helps maintain a stable horizontal position and reduces the chance of foot-heavy trim.
Expert Tip
Whenever you switch wetsuit thickness, treat it as a new weighting setup. Even a small change in exposure protection can affect both buoyancy and trim underwater.
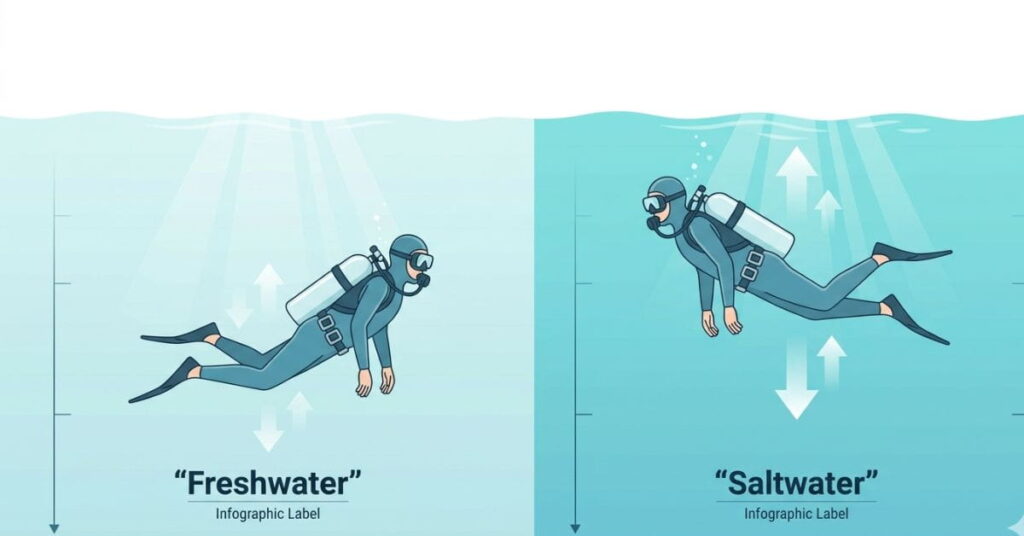
Saltwater vs Freshwater Weight Belt Adjustments
A scuba weight belt setup that works perfectly in a lake may not perform as well in the ocean. The main reason is buoyancy. Saltwater is denser than freshwater, which means it provides more natural lift to both the diver and the equipment.
Because of this difference, many divers need to adjust both the amount of lead they carry and the distribution of that weight. Failing to make these adjustments can affect trim, buoyancy control, and overall comfort underwater.
Extra Lead Needs
Most divers require more lead in saltwater than in freshwater. The extra buoyancy created by saltwater makes it harder to descend and maintain neutral buoyancy with the same weighting setup.
The exact amount varies depending on body composition, exposure suit, and equipment. Rather than guessing, perform a proper buoyancy check whenever changing environments.
A few additional pounds may be enough for some divers, while others may require larger adjustments.
Repositioning Weight
Adding an extra lead is only part of the equation. Changes in total weight can alter how your body sits in the water.
If an additional lead causes discomfort or affects the trim, consider redistributing the weight rather than placing it all in one location. Spreading weight evenly between both sides and using trim pockets when needed can help maintain a balanced position.
Small adjustments often produce better results than major changes.
Buoyancy Changes
The transition between freshwater and saltwater can affect more than just descent rates. Divers may notice differences in horizontal trim, finning efficiency, and overall buoyancy control.
A setup that keeps you level in freshwater might feel slightly different in the ocean. This is why experienced divers perform a quick trim assessment whenever they change diving environments.
Taking a few minutes to fine-tune weight placement can make dives more comfortable and efficient.
Expert Tip
If you regularly dive in both freshwater and saltwater, keep a log of your successful weighting setups. Recording weight amount and placement makes future adjustments much easier.
Advanced Trim Optimisation Techniques
Once you have the correct amount of lead and a balanced scuba weight belt setup, you can start fine-tuning your trim. Trim optimization focuses on body position rather than total weight. The goal is to maintain a relaxed, horizontal posture with minimal effort.
Many divers assume poor trim means they need more or less weight. In reality, small equipment adjustments often solve balance issues more effectively. These advanced techniques can help improve comfort, buoyancy control, and underwater efficiency.
Tank Bands and Cam Bands
Tank bands and cam bands do more than secure your cylinder. Their position can also influence your trim.
If your feet tend to sink, raising the tank slightly may help move buoyancy and weight higher on your body. If your head drops, lowering the tank slightly may improve balance.
Make adjustments gradually and test one change at a time. Even a small shift can noticeably affect your position underwater.
Rear Trim Pockets
Rear trim pockets are designed for fine-tuning balance. These pockets are usually located near the tank or on the back section of the BCD.
Adding a small amount of weight to rear trim pockets can help counteract heavy legs and improve horizontal trim. Many divers only need 1–2 pounds in these pockets to notice a difference.
Avoid overloading trim pockets, as too much rear weight can create new balance problems.
Shoulder Balance
Good trim is not just about your hips and legs. Weight distribution around the upper body also affects positioning.
Some BCDs include shoulder or upper-back trim pockets that allow small adjustments near the torso. These pockets can help divers who struggle with a head-heavy or foot-heavy position.
The goal is to create an even balance from shoulders to fins without forcing the body into position.
Streamlining
Trimming and streamlining work together. Even perfectly placed weights cannot compensate for loose equipment creating drag underwater.
Keep hoses secured, accessories clipped close to the body, and gear arranged neatly. A streamlined profile reduces resistance and helps you maintain trim with less effort.
This also improves finning efficiency and may help conserve energy during longer dives.
Expert Tip
Many experienced divers spend more time moving existing weight than adding new lead. A small shift in tank position or trim-pocket weight often produces a bigger improvement than carrying extra pounds.
Safety Tips for Weight Belt Use
A scuba weight belt is more than a tool for buoyancy control. It is also an important piece of safety equipment. A properly maintained and correctly worn belt can help you respond quickly if a problem occurs underwater.
Many weight-belt accidents occur because divers neglect basic safety practices. Regular inspections, proper training, and good equipment habits can reduce risks and improve confidence during every dive.
Practice Quick-Release Training
Every diver should know how to release a weight belt without hesitation. In an emergency, extra buoyancy from ditching weights may help you return to the surface more easily.
Practice locating and releasing the buckle before entering the water. You should be able to find it by touch alone without looking down.
If you switch equipment or use rental gear, take a moment to review the release system before the dive.
Perform Emergency Ditching Drills
Knowing how a weight belt works is not enough. Divers should occasionally rehearse emergency ditching procedures in a controlled environment.
These drills help build muscle memory and reduce hesitation during stressful situations. They also allow you to verify that nothing blocks access to the buckle or release mechanism.
Practice should always be conducted under safe conditions and with appropriate supervision when needed.
Maintain Your Weight Belt
A worn or damaged belt can create problems underwater. Inspect the webbing, buckle, stitching, and weight retainers regularly for signs of wear.
Replace cracked buckles, frayed straps, or damaged components before they fail. Routine maintenance helps ensure the belt functions properly when you need it most.
A quick inspection before each dive only takes a few minutes.
Prevent Corrosion
Saltwater can damage metal components over time. After diving, rinse the belt thoroughly with fresh water and allow it to dry completely before storage.
Pay close attention to buckles, clips, and any metal hardware. Regular cleaning helps prevent corrosion and extends the life of your equipment.
Proper storage also reduces unnecessary wear between dive trips.
Avoid Entanglement Hazards
Loose accessories, dangling gear, and poorly secured equipment can create entanglement risks. These hazards may interfere with belt release or restrict movement underwater.
Keep hoses streamlined, secure accessories close to your body, and ensure nothing obstructs the weight belt buckle. A clean gear configuration improves both safety and comfort.
Expert Tip
Many dive professionals perform a quick “release check” before entering the water. They confirm the buckle is visible, unobstructed, and easy to reach with one hand.
Scuba Weight Belt Setup Examples
There is no single scuba weight belt setup that works for every diver. Body type, exposure protection, equipment configuration, and diving environment all influence weight placement. A setup that feels balanced for one diver may not work well for another.
The examples below show common weighting approaches used in different diving situations. These are starting points only. Always perform a buoyancy and trim check to fine-tune your own setup.
Tropical Travel Diver
A tropical travel diver typically uses a thin 3mm wetsuit or shorty and carries relatively little lead. Because less weight is required, most of the lead can usually remain around the hips or within integrated BCD pockets.
This simple setup often provides good trim and comfort without additional trim weights. Divers should still balance weight evenly between both sides to prevent rolling underwater.
Cold-Water Recreational Diver
Cold-water divers often wear a 7mm wetsuit or semi-dry suit, which increases buoyancy and requires more lead.
Carrying all of this weight on a single belt can become uncomfortable. Many divers improve comfort by splitting weight between a belt, integrated pockets, and rear trim pockets. This approach helps maintain better balance while reducing pressure on the hips and lower back.
Technical Diver
Technical divers typically carry larger cylinders, additional equipment, and multiple gas sources. Because of these factors, weight distribution becomes extremely important.
Many technical setups use a combination of weight belts, trim pockets, tank-mounted weights, and integrated systems. The goal is to maintain a stable horizontal trim position throughout the dive, despite changes in gas volumes and equipment configurations.
Weight placement is usually adjusted carefully during training and practice dives.
Female Diver Setup
Many female divers find that slight changes in weight placement improve both comfort and trim. Body proportions, centre of gravity, and equipment fit can influence how weight should be distributed.
Integrated weight systems are often popular because they reduce pressure on the hips. Some divers also benefit from moving a small amount of weight into trim pockets to achieve a more balanced position.
As with any setup, comfort and underwater balance should guide final adjustments.
Expert Tip
When you find a setup that provides good trim and buoyancy, record it in your dive log. Keeping notes on weight amount, placement, wetsuit thickness, and water type makes future dives much easier to prepare for.
When to Reevaluate Your Weight Distribution
A scuba weight belt setup is not something you configure once and forget. As your equipment, body, and diving conditions change, your weight distribution may need to be adjusted as well.
Many divers continue using the same setup for years, even after replacing major pieces of gear. This can lead to trim problems, poor buoyancy control, and unnecessary effort underwater. Reviewing your weighting system regularly helps maintain comfort, efficiency, and safety.
New BCD
A new BCD can change how weight is distributed around your body. Different models vary in buoyancy characteristics, trim pocket locations, and integrated weight systems.
Even if your total lead remains the same, your body position underwater may feel different. Perform a buoyancy check and trim assessment whenever you switch BCDs.
New Wetsuit
Changing exposure protection is one of the most common reasons to reevaluate weighting. Thicker wetsuits create more buoyancy and often require additional lead.
However, the amount of weight is only part of the equation. A new wetsuit may also affect how your body balances in the water, necessitating adjustments to weight placement.
Weight Changes
Body weight fluctuations can influence buoyancy over time. Significant weight gain or loss may change how much lead you need and where it should be positioned.
If you notice differences in buoyancy control or comfort, it may be time to reassess your setup rather than continuing with old weight configurations.
Tank Changes
Different cylinders have different buoyancy characteristics. For example, switching between aluminium and steel tanks can affect both trim and overall balance during a dive.
Whenever you begin using a new tank type, test your buoyancy and evaluate your underwater position before assuming your previous setup will still work.
Ongoing Buoyancy Issues
Persistent buoyancy problems often signal that something needs adjustment. If you constantly struggle to stay level, maintain neutral buoyancy, or control your position in the water, review your weighting system.
Many trim and buoyancy issues can be solved by repositioning existing weight rather than adding more lead.
Conclusion
A well-balanced weighting system can make every dive safer, easier, and more enjoyable. Throughout this guide, we’ve covered proper weight placement, trim optimization, common mistakes, safety practices, and the effects of different gear setups on buoyancy.
Remember, a successful scuba weight belt setup depends on more than the total amount of lead you carry. Proper scuba diving weight distribution helps improve trim, comfort, finning efficiency, and overall buoyancy control. Small adjustments in weight placement can often make a noticeable difference underwater.
As your equipment, exposure suit, or diving conditions change, take time to reassess your setup and make necessary adjustments. Consistent fine-tuning leads to better performance and confidence on every dive.
Have a favourite weighting tip or trim adjustment that works for you? Share your experience in the comments and explore our other scuba guides and tools to continue improving your diving skills.
A perfect scuba weight belt setup starts with the correct amount of lead. Use our Scuba Diving Weight Calculator to estimate your recommended dive weight before fine-tuning your weight distribution and trim.

Scuba Diving Researcher & Beginner Guide
Evan Calder is the creator of DiveBeginner, a website dedicated to helping beginners learn scuba diving simply and practically 🌊
He focuses on scuba fundamentals, beginner safety, and clear diving guidance. Evan has studied ocean and marine science through programs at the Scripps Institution of Oceanography, UC San Diego, a globally recognized leader in ocean research.
Instead of complex technical language, Evan provides easy-to-follow, beginner-friendly guides based on real-world research, helping first-time divers feel confident before their first dive 🤿
DiveBeginner reflects his passion for making scuba diving accessible, safe, and enjoyable for everyone.